It's been a busy and short two weeks since Anand and I thoroughly covered smartphones, tablets, and SoCs at MWC. I got back to an ever-growing pile of monitors that need reviewing, he got back to the Xoom and new SSDs.
In the monitor space, it's been an interesting couple of months because everyone has been updating their 30-inch display. We reviewed the HP ZR30w back when that happened and came away impressed but wanting more in a couple of areas - more input options, an OSD, and a better scaler. Then came Dell U3011, which brought equally decent performance, a wealth of input options, and that OSD we wanted.
Today we're looking at NEC's latest and greatest, the MultiSync PA301w. I've been playing with a pre-production unit which is identical to what will be shipping, and have put it through the usual paces of our monitor testing suite. First up is the specification table:
| NEC MultiSync PA301w | |
| Video Inputs | 2xDVI-D w/HDCP, 2xDisplayPort 1.1a |
| Panel Type | P-IPS 10-bit with CCFL Backlight - 0Z100223UW |
| Pixel Pitch | 0.251 mm |
| Colors | 1.07 billion (30 BPP color w/appropriate GPU) |
| Brightness | 350 nits (typical) |
| Contrast Ratio | 1,000:1 (typical) |
| Response Time | 7 ms (GTG), 12 ms (max) |
| Viewable Size | 29.8" (75.6 cm) |
| Resolution | 2560 x 1600 at 60 Hz |
| Viewing Angle | 178 degrees horizontal and vertical |
| Power Consumption (operation) | 165 watts (typical), 90 watts (eco) |
| Power Consumption (standby) | 1.7 watts (standby), 0.2 watts (off) |
| Screen Treatment | Matte/Anti-Glare |
| Height-Adjustable | Yes: 5.9 inches (landscape), 1.2 inches (portrait) |
| Tilt | Yes: +30 degrees, -10 degrees |
| Pivot | Yes: Landscape and Portrait |
| Swivel | Yes: +/- 30 degrees |
| VESA Wall Mounting | Yes: 100 mm x 100 mm |
| Dimensions w/ Base (WxHxD) | 27.1" (688.0 mm) x 18.4-24.3" (466.4-646.4 mm) x 11.9" (301.6 mm) |
| Weight | 41.5 lbs (18.8 kg) with stand |
| Additional Features | Integrated USB 2.0 Switch (2 upstream, 3 downstream, 500mA), self calibration support with i1D2, 10-bit color, quick warmup |
| Limited Warranty | 4 years |
| Accessories | Power, DVI-D, DisplayPort, and USB cables, 4x VESA screws |
| Price | PA301w: $2299, PA301w-BK-SV: $2549 |
Right away you can tell the PA301w is in a different class of professional displays than the two other counterparts I've already mentioned. It's priced accordingly, and has the professional-oriented inputs and other features. There's no HDMI or component in, nor is there audio pass through. The PA301w is aimed at the professional that demands uncompromising performance and has the budget to satisfy that need. The PA301w is built around a 10-bit P-IPS (Professional-IPS) panel likely sourced from LG. Like the current crop of 30-inch monitors, that means you can drive 30 bit per color (10-bit per channel) content over DisplayPort if you have a capable GPU and the right software. I'm still searching for software that actually uses 30-bit color (if you know of any, I'd honestly love to hear about it), but when that time comes, it'll be supported.
The PA301w also has a few features that I haven't seen in a monitor before. Chief among them is onboard support for some basic calibration with an X-Rite i1D2 colorimeter. Plug it into a USB port on the side of the monitor, go into the OSD, and the display will automatically calibrate white point, brightness, and the color tristimulus values. It doesn't displace software calibration, but gets the monitor to a very workable initial starting position you can tweak from, which (if you've ever calibrated a display before) can be a huge timesaver. The other interesting hardware feature is something of a built-in KVM USB switch. There are two USB downstream ports, which can be associated with particular display inputs and switch peripherals accordingly. Lastly, there are a number of green/power-saving features to both show power use and offer power savings by doing some auto brightness adjustment when applicable.
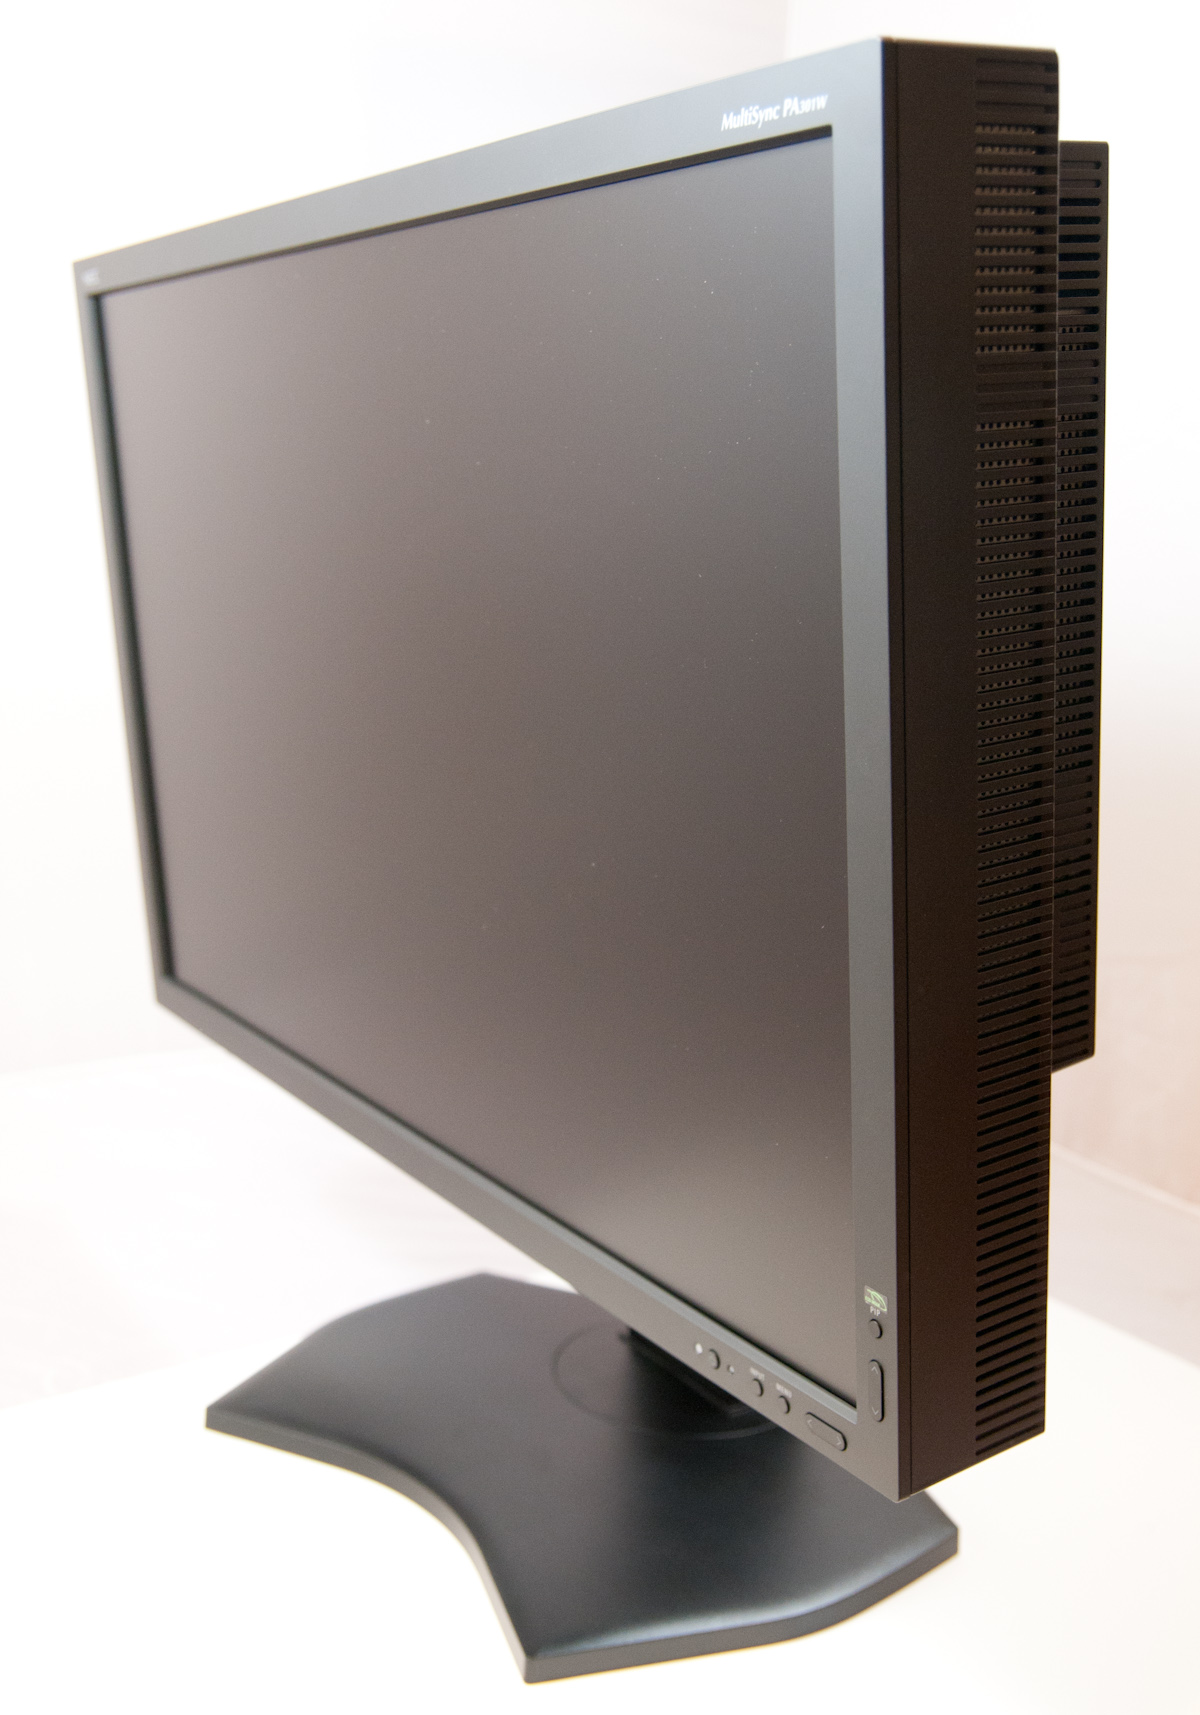
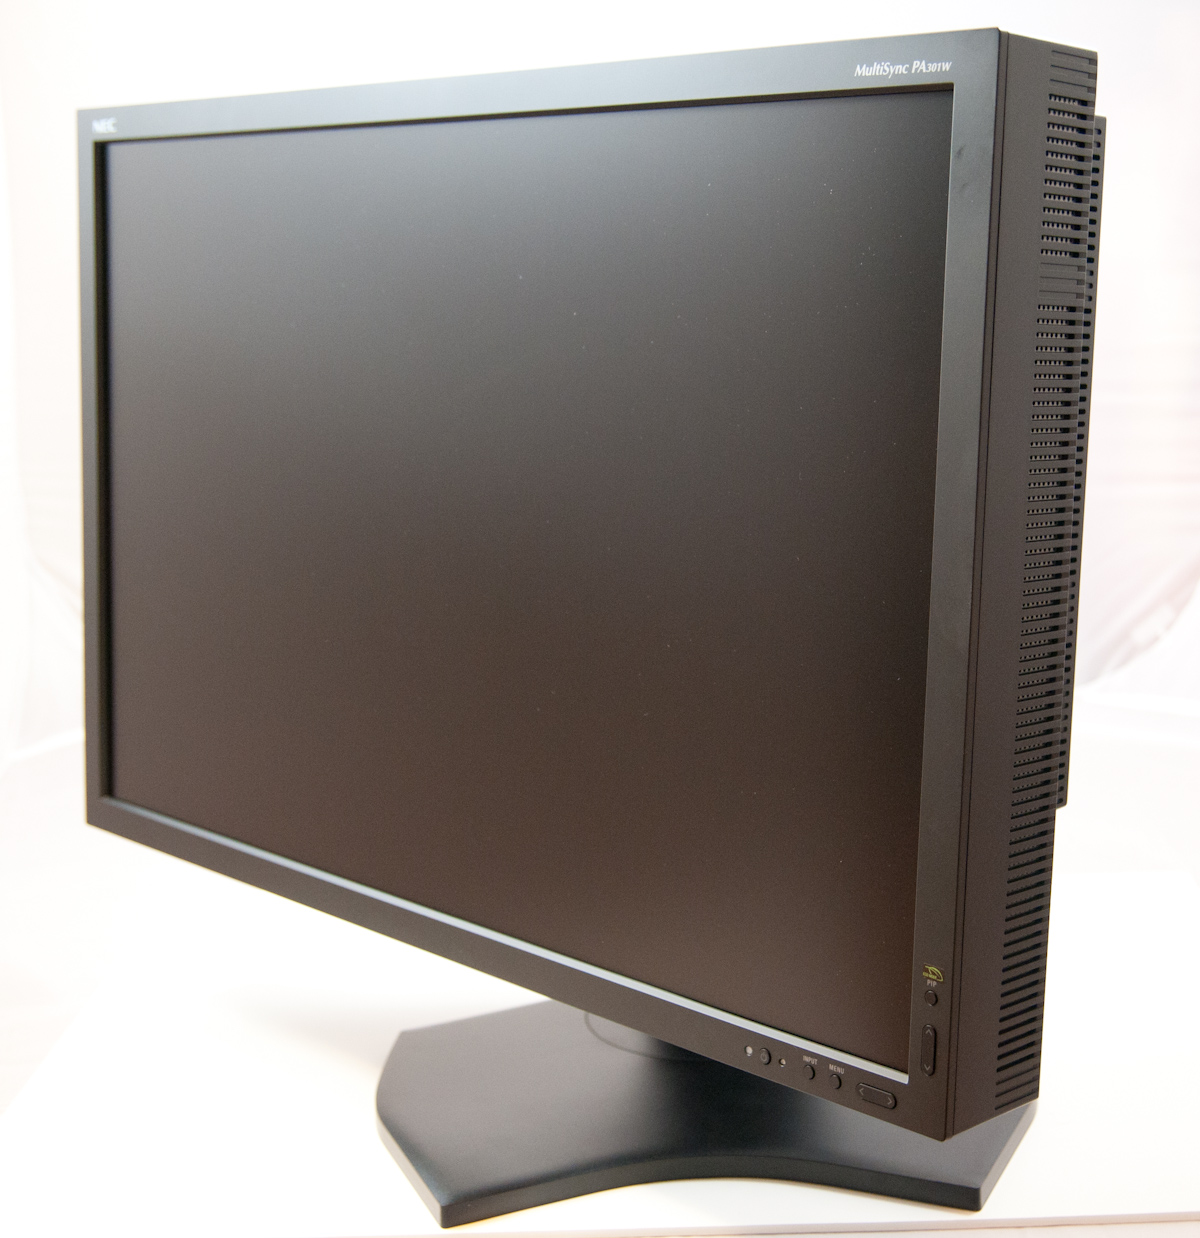
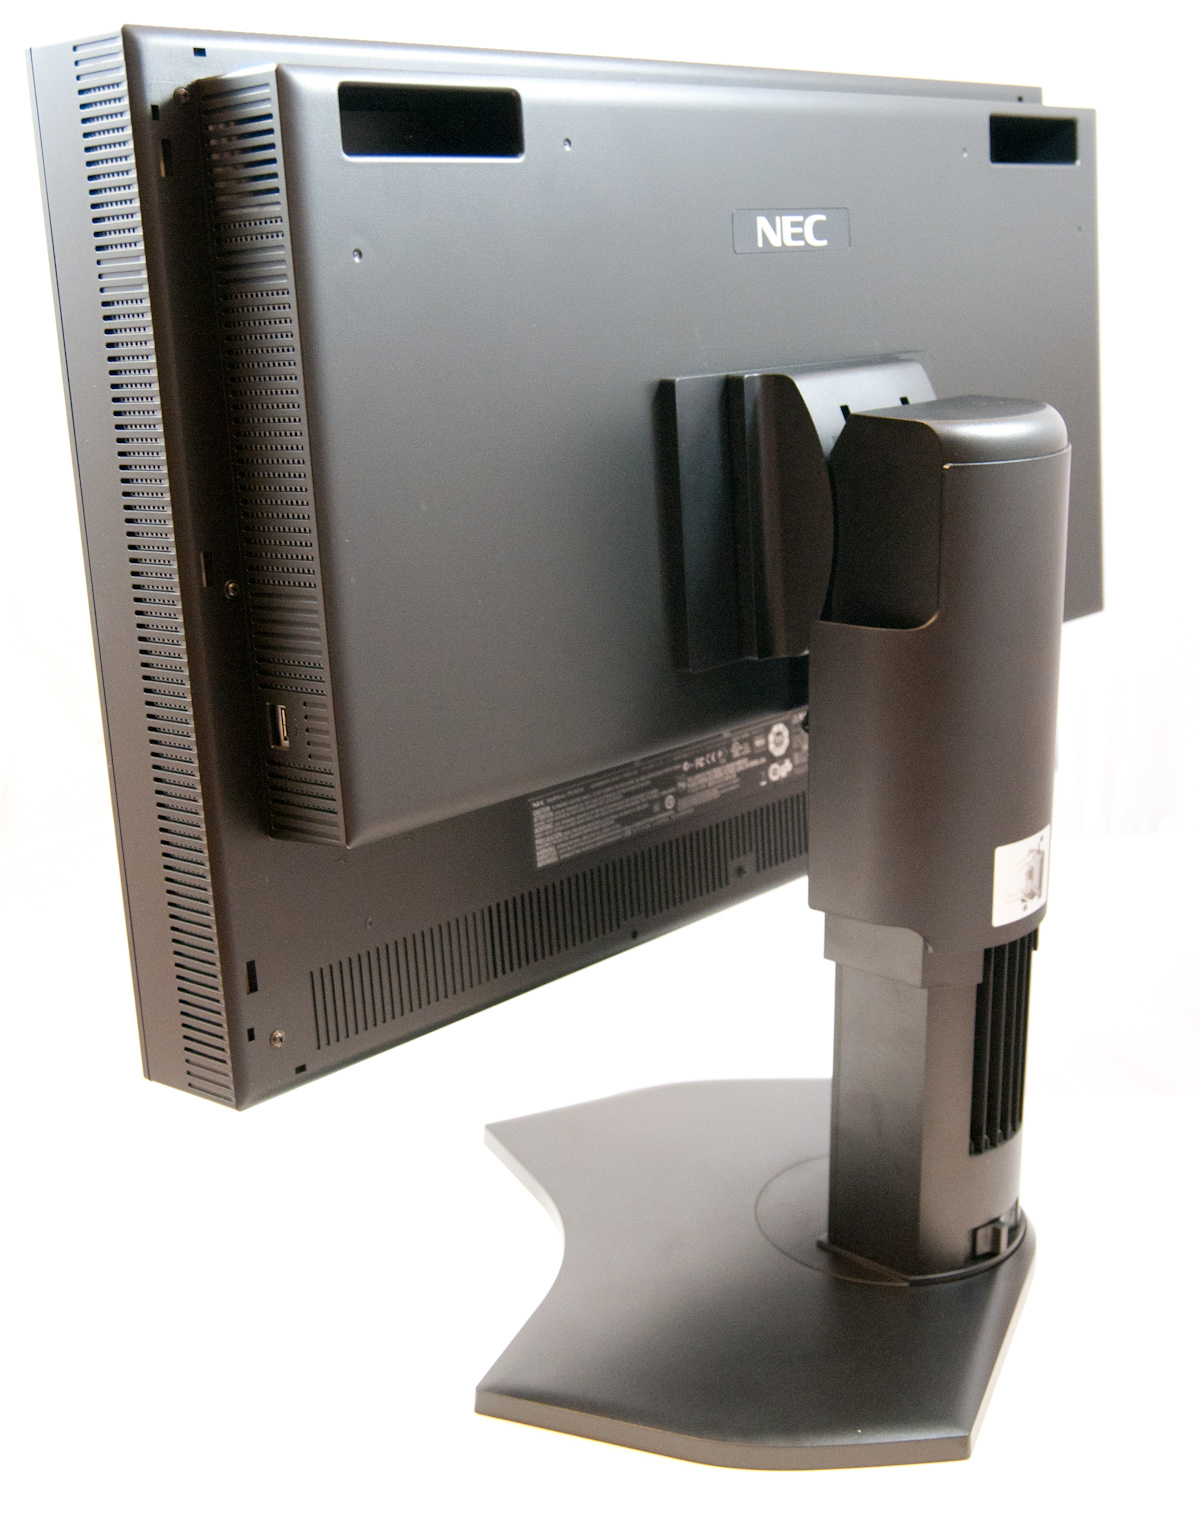
On to the hardware itself - the PA301w is seriously a beast. It's the biggest, baddest monitor around in terms of just sheer size. I don't usually start off talking about boxes, but there's just no other way to really demonstrate the magnitude of the PA301w's size without doing so.
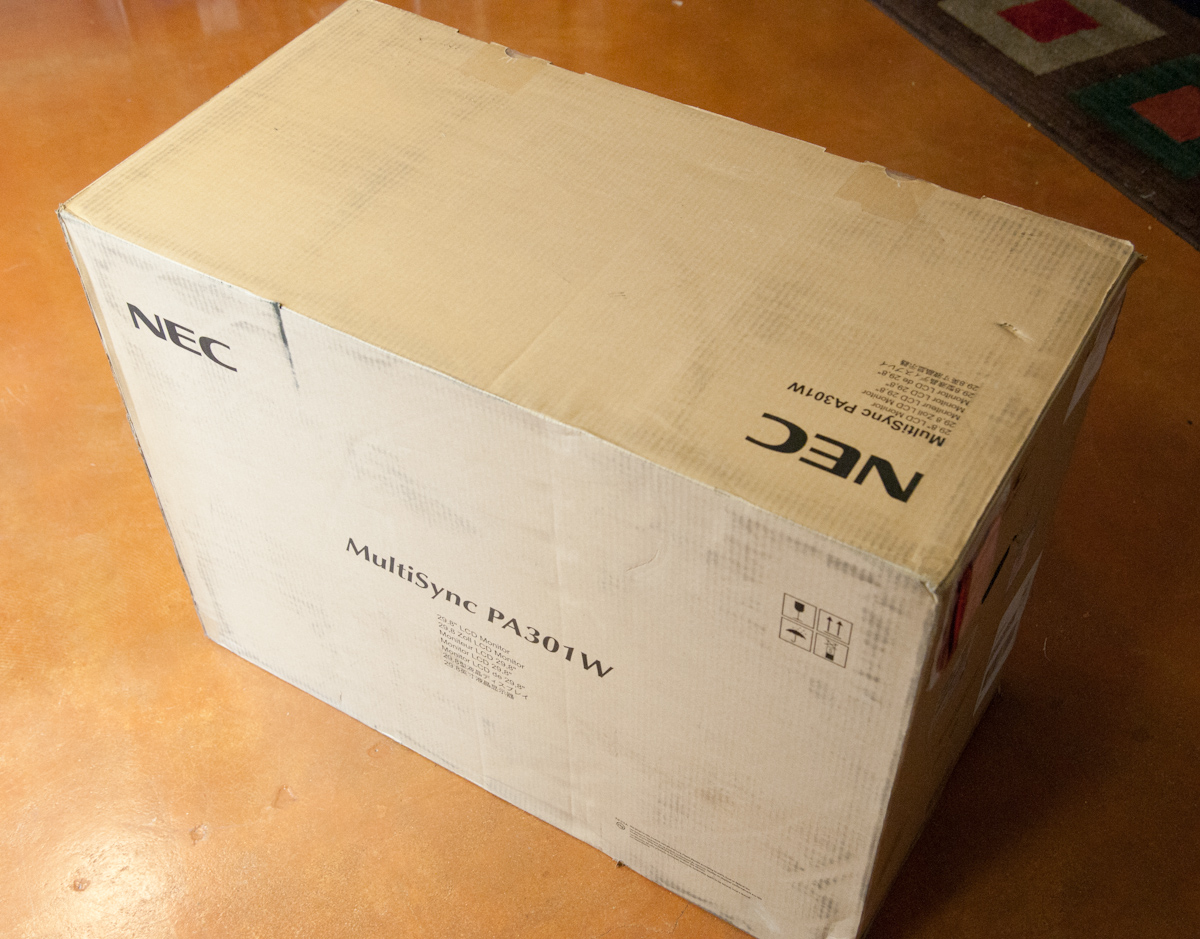
The box is easily two times the size of the HP ZR30w box, and almost three times how big I remember the Dell U3011 box being. It doesn't fit underneath any table or surface in my living room. It fills a good chunk of that room just sitting around, empty, even right now. I've never seen something like it on a monitor box (maybe a refrigerator?), but there's even a wince-inducing typo-ridden warning message encouraging that the monitor be remobed[sic] by two people.

Luckily, I have superhuman strength (yeah right...) and managed to get the thing out intact just by myself. It's a heavy monitor, at just over 41 lbs (18.8 kg) including stand. The PA301w comes fully assembled and in the upright position. There was more than adequate packing to keep the whole thing safe during transit.
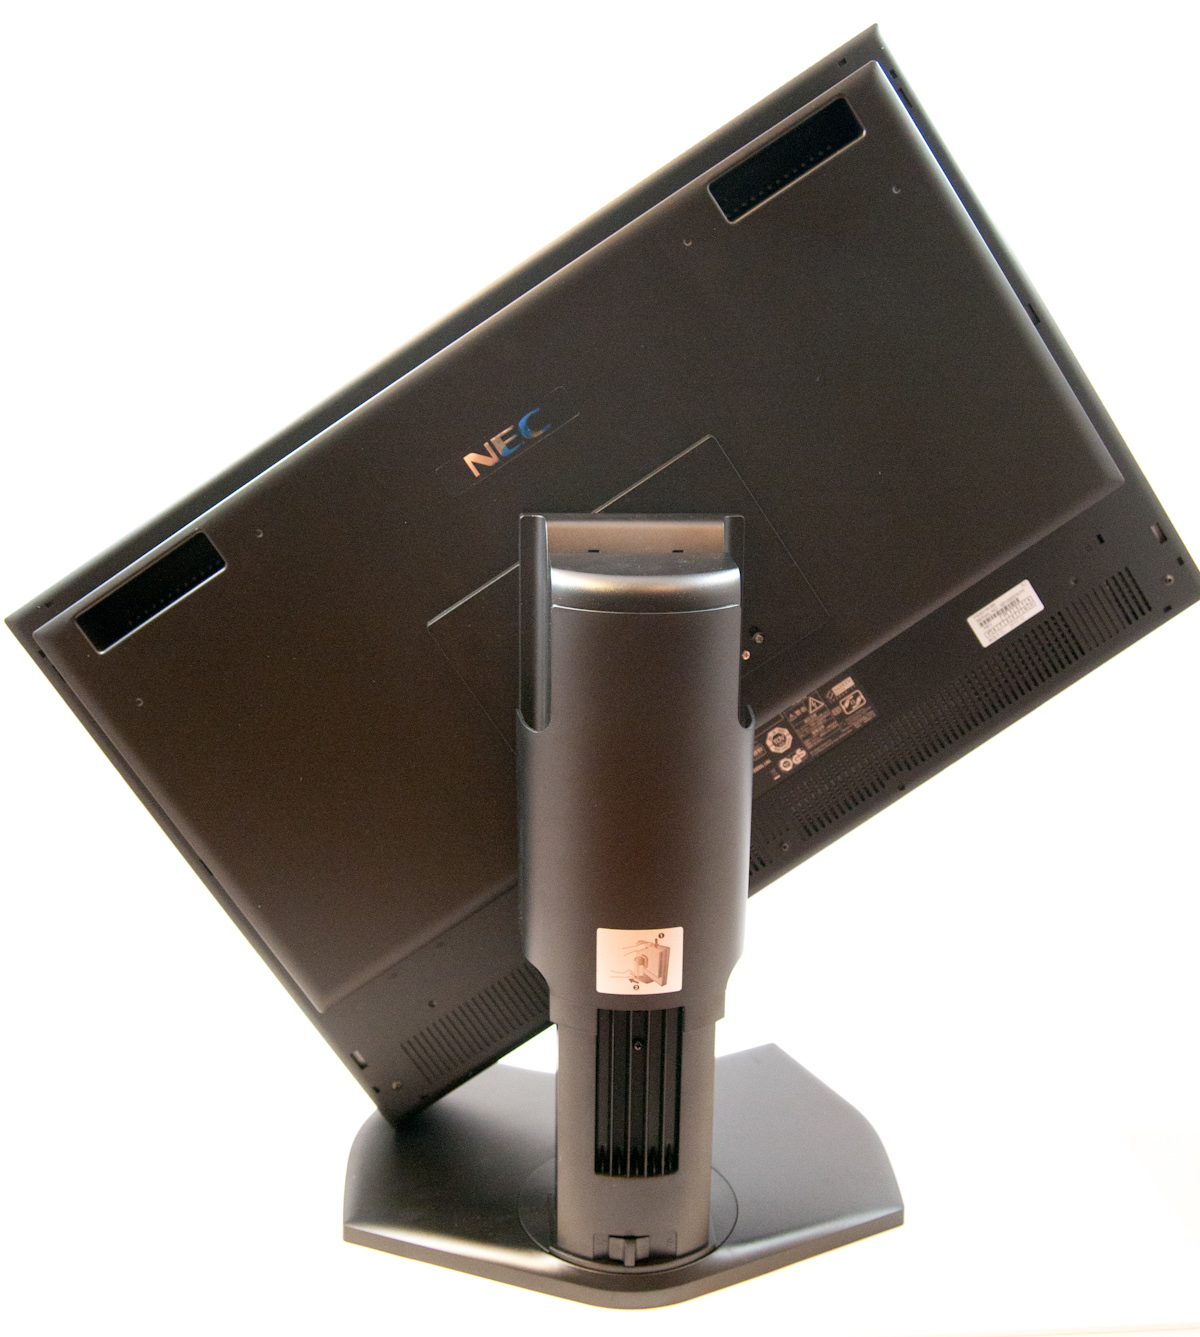
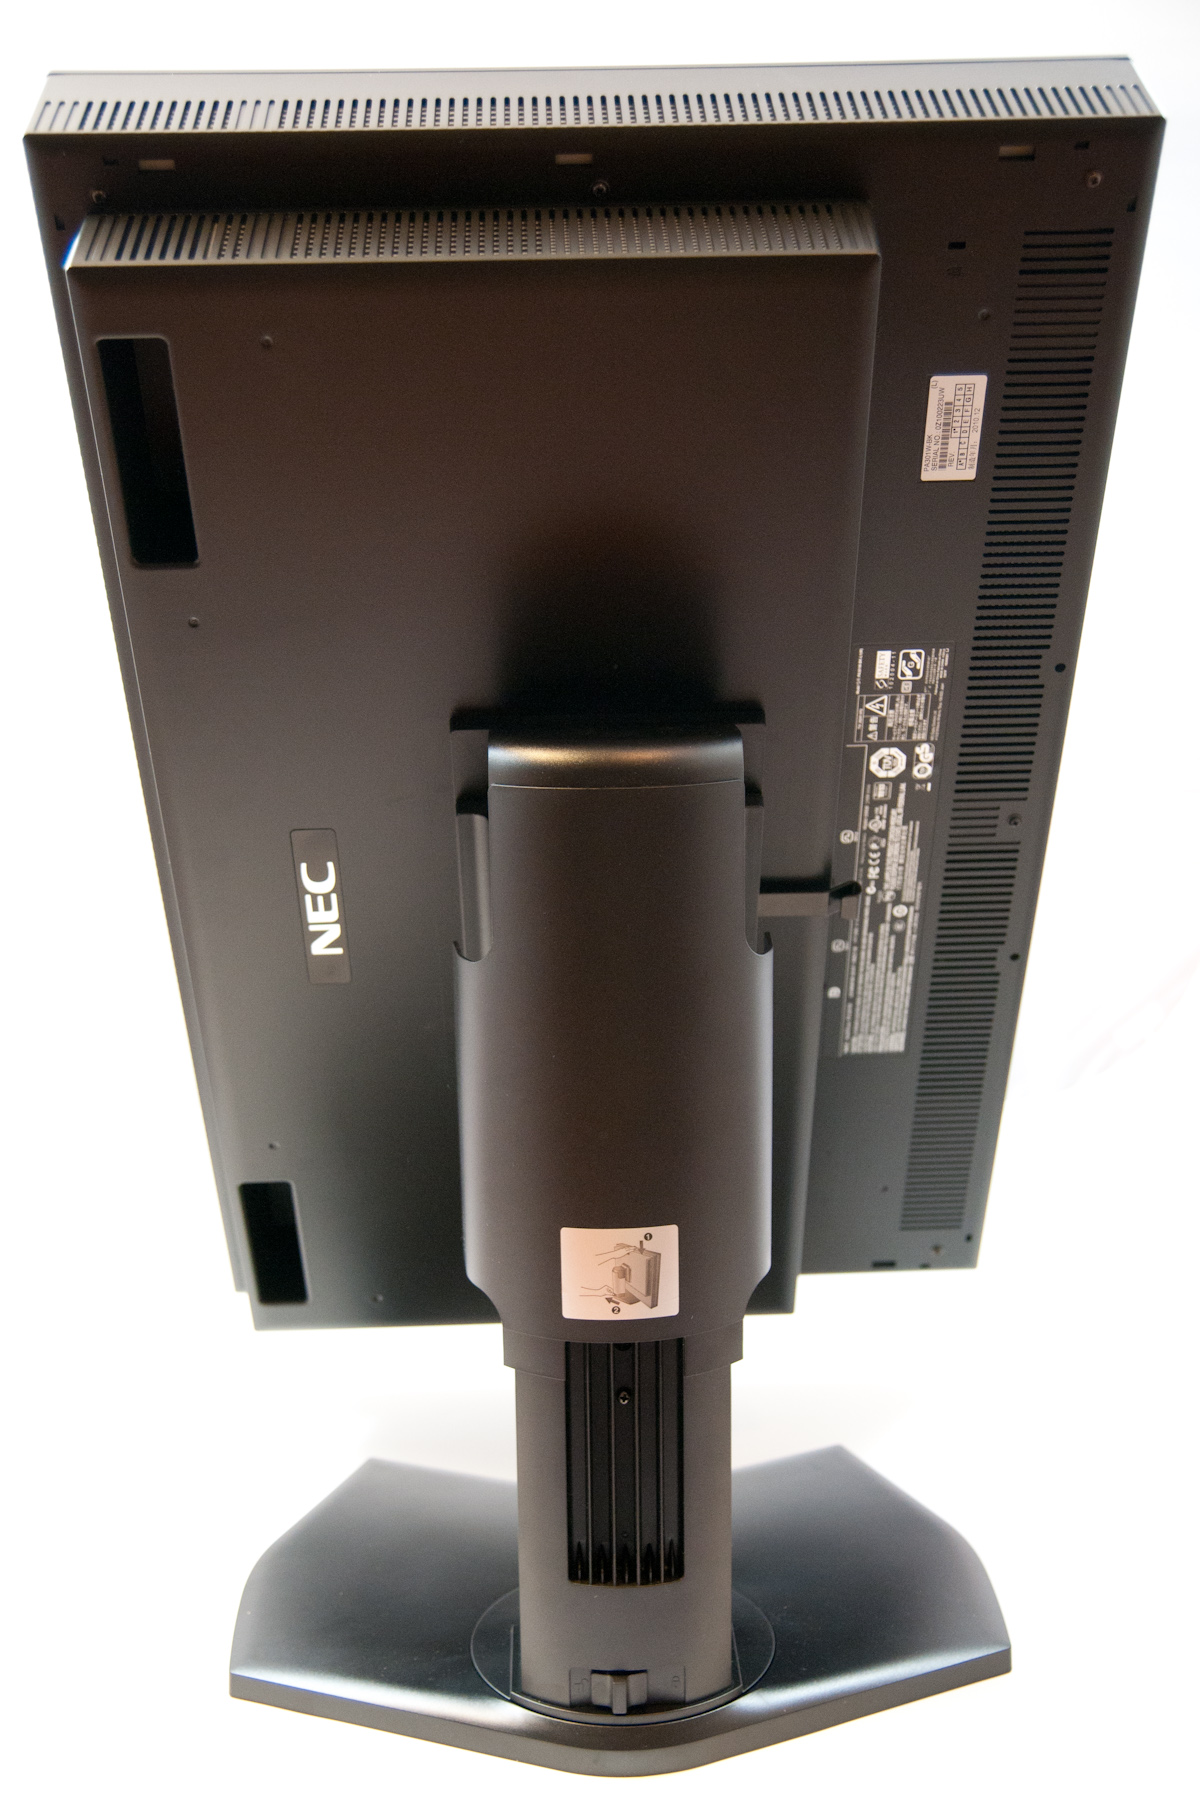
That's a nice segue into the hardware features of the PA301w. At the bottom of the display arm is a locking switch for holding the monitor at its lowest position.
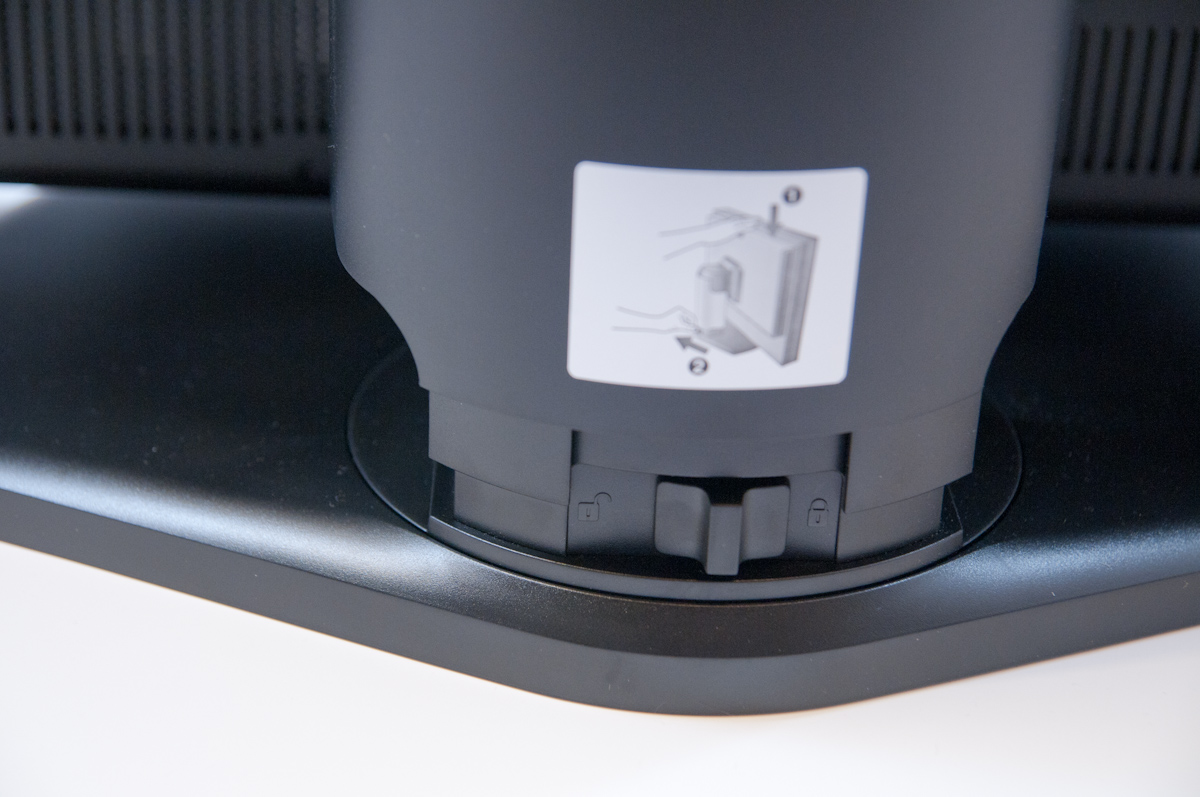
The display ships with it locked in position so you can lift the thing without the height adjustment arm fully extending. It's seriously surprising how many displays lately lack locking height adjustment arms, which makes transportation a pain, so it's nice to see it here.
Also on the back of the display is a cable routing guide, which NEC calls a "cable cover." You route the cables underneath on each side, then slide the plastic cover down and hide everything. In practice, it's really only useful if you don't rotate the monitor 90 degrees, since doing so will always create cable flex and demand more slack than you've got back there. It works if you keep things strictly landscape, however.
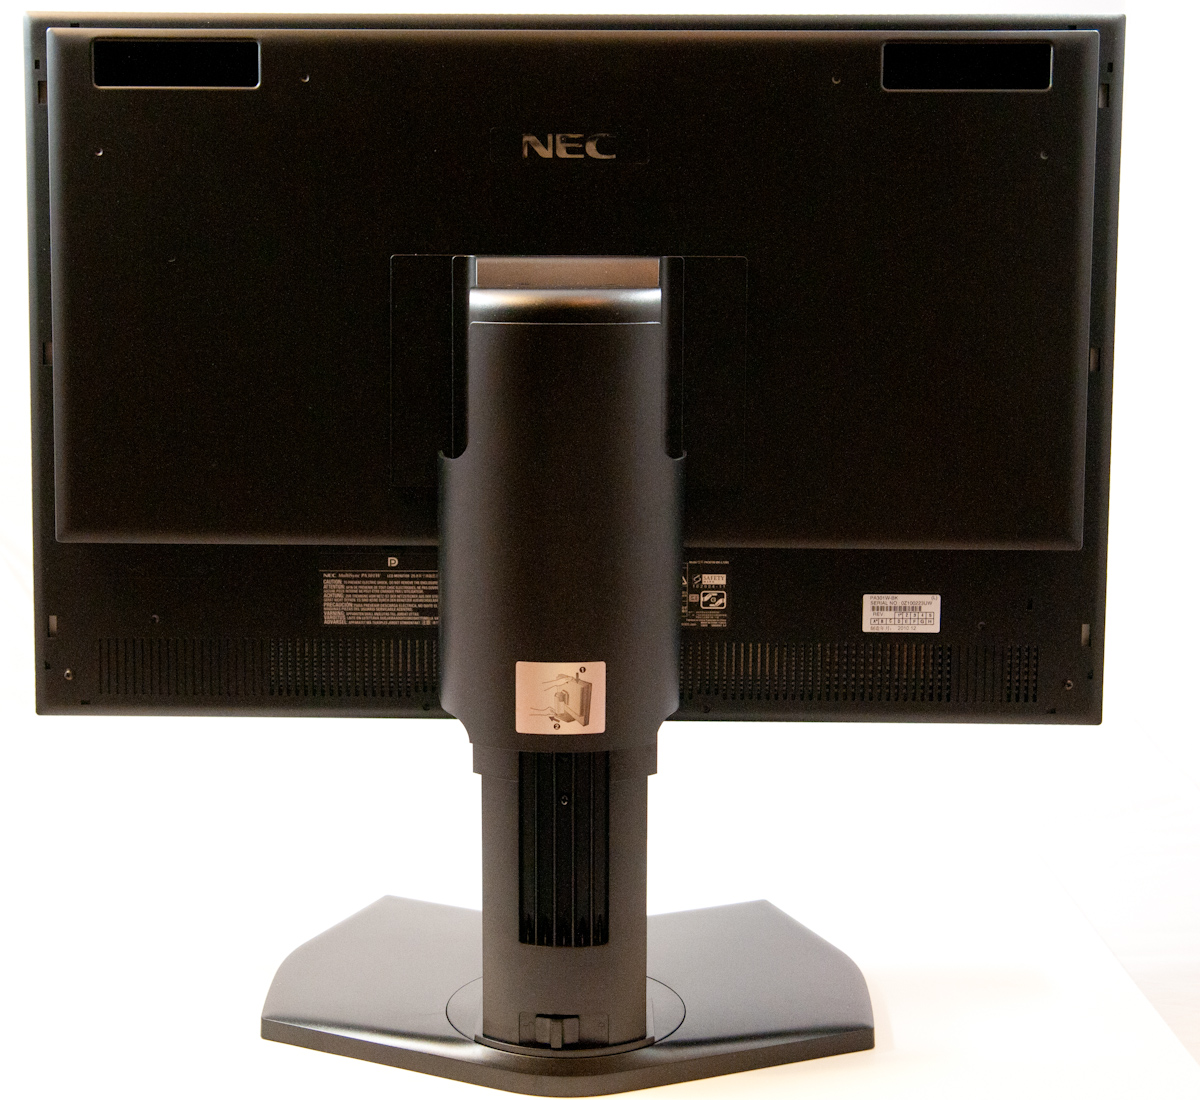
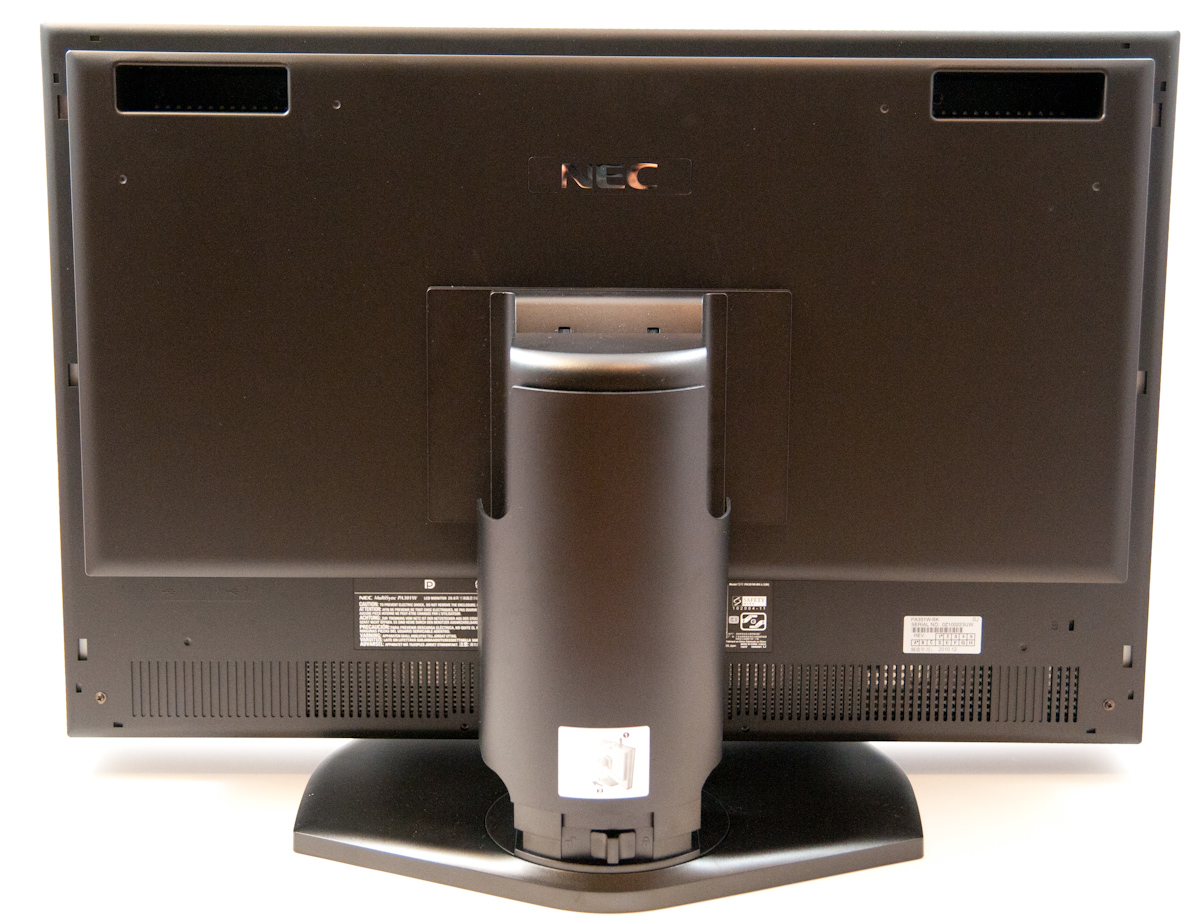
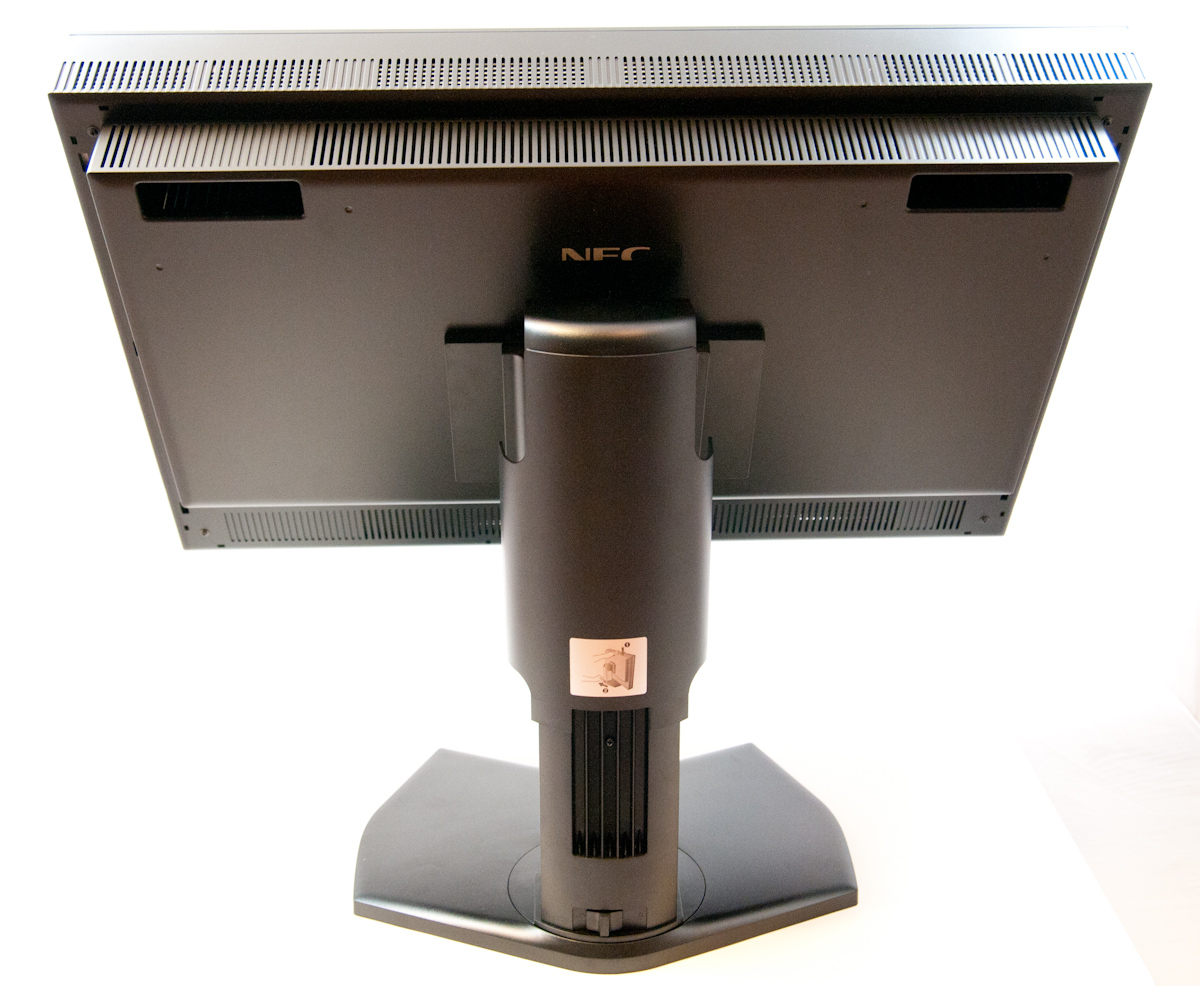
The backside of the PA301w is on the whole very spartan. There's an NEC logo up top, the two hand grips for transport if you're lucky enough to have a friend handy, and as we'll get to in a second the standard fare kensington lock and ports on the underside. There's a total of 5.9 inches of travel in the vertical direction when the monitor is in landscape mode, which is a huge amount, but necessary for portrait mode.
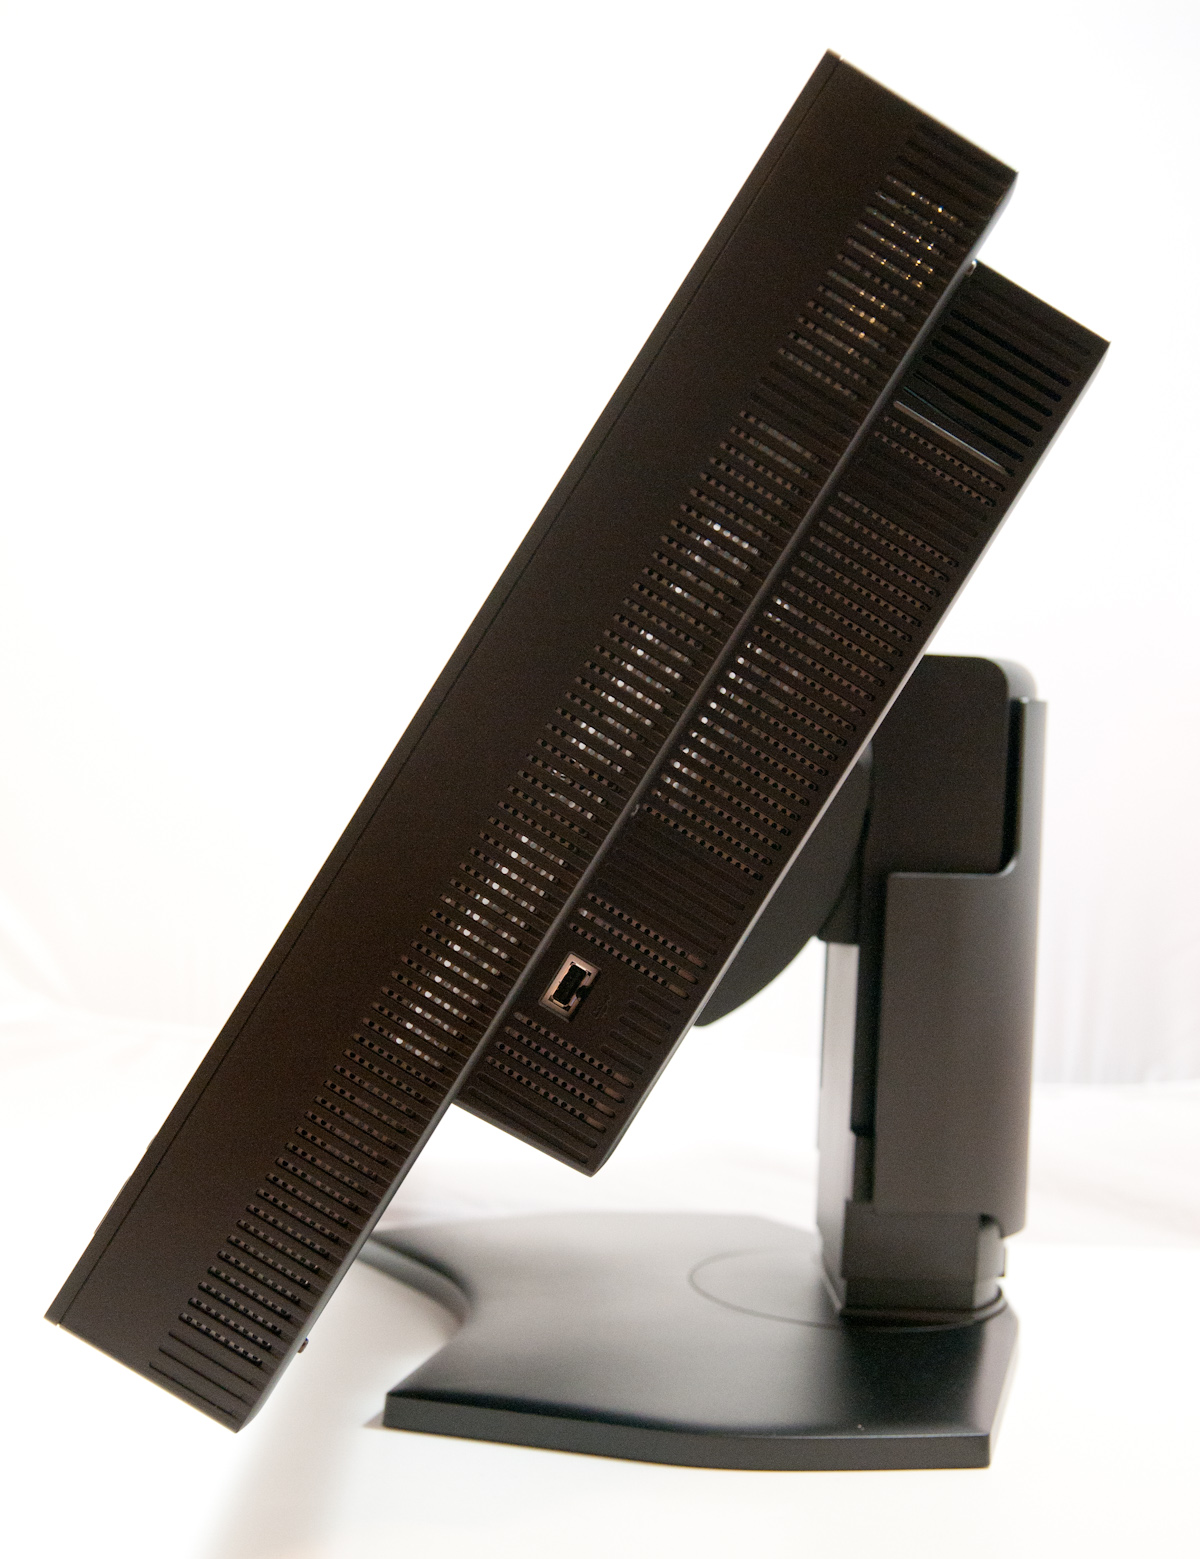
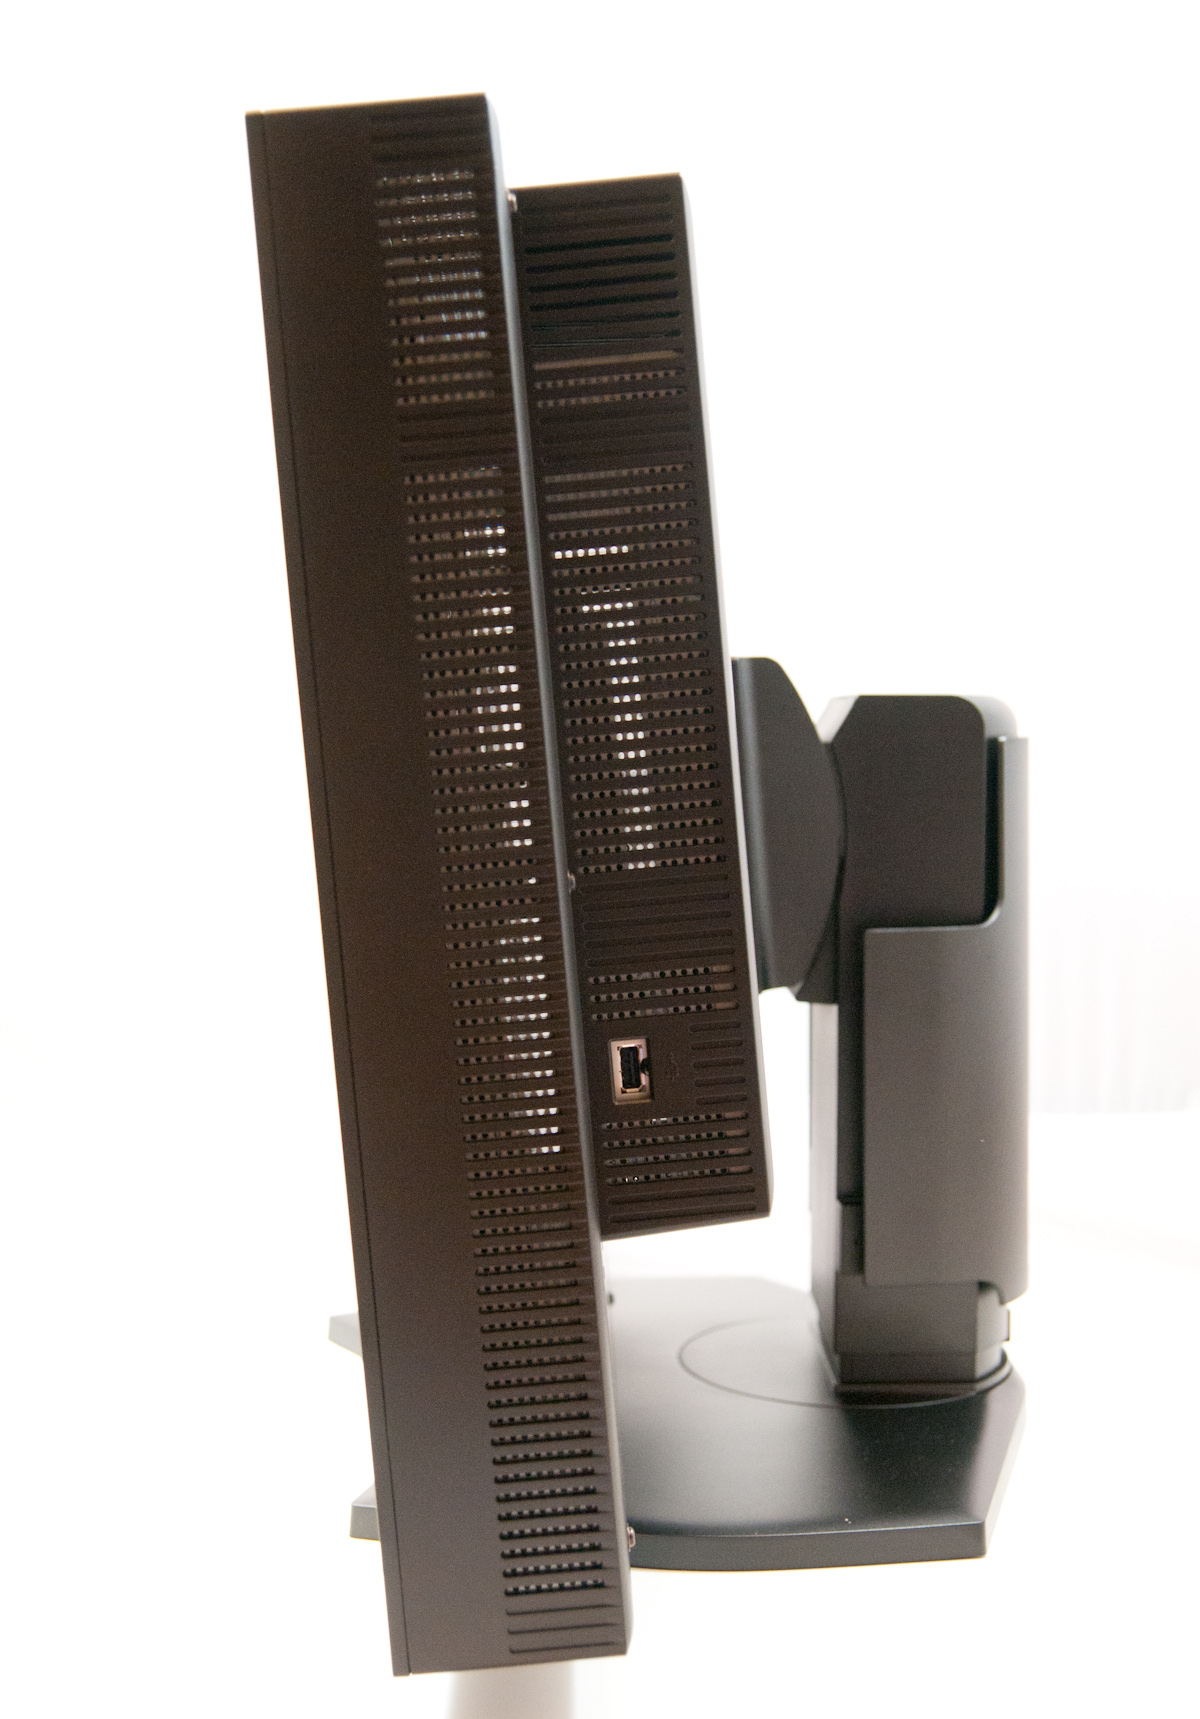
The PA301w has a generous amount of tilt in the upward direction (30 degrees), and only a slight 5-10 degree tilt in the downward direction. There's a lot of monitor to move around, but in spite of that, the springs on the PA301w are nicely preloaded. Tilt can still be somewhat challenging to manipulate though, and definitely requires use of both arms to manipulate the display.
There's also +/- 30 degrees of swivel support on the base. You can see the circular section at the back which the display arm rotates around. The base is weighted and there's no chatter as the huge thing rotates around, which is awesome. Thankfully, swivel is easily accomplished with one arm.
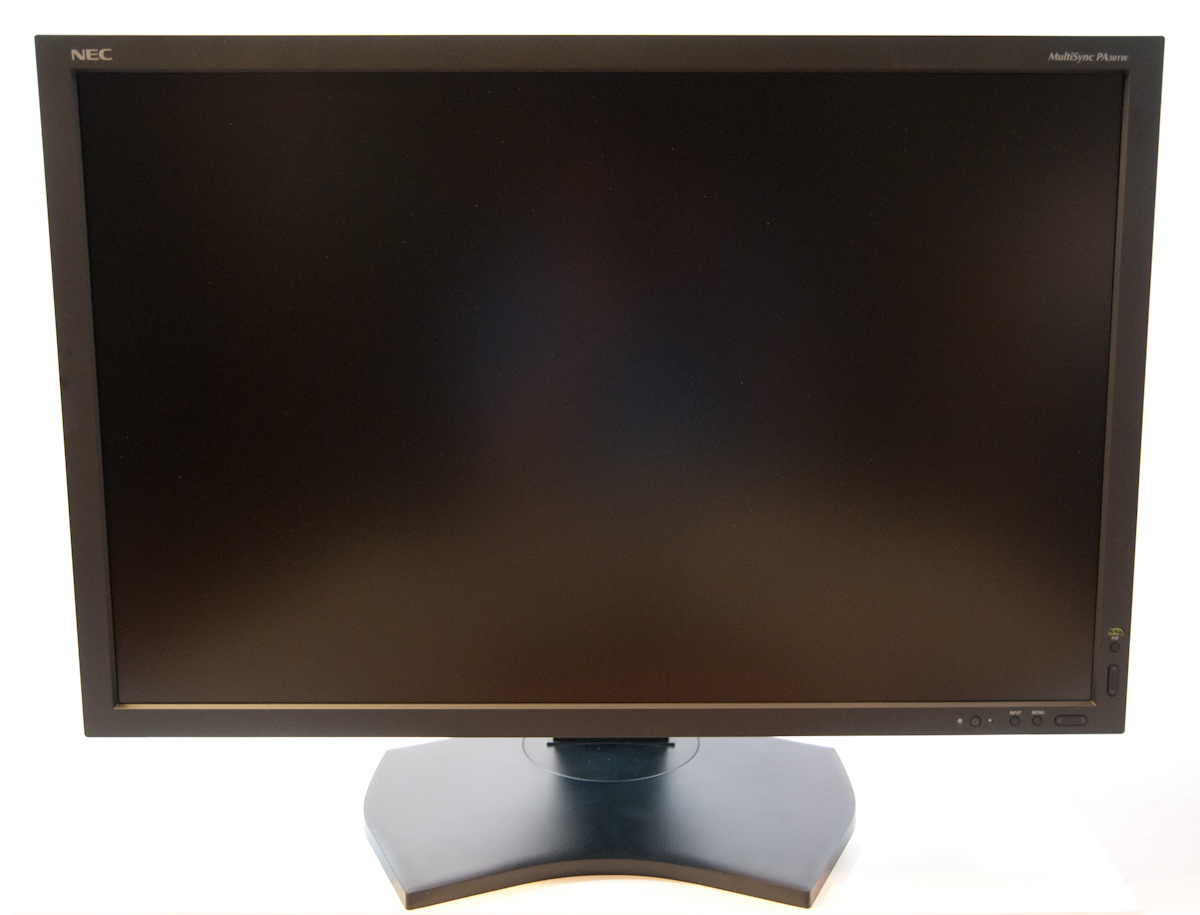
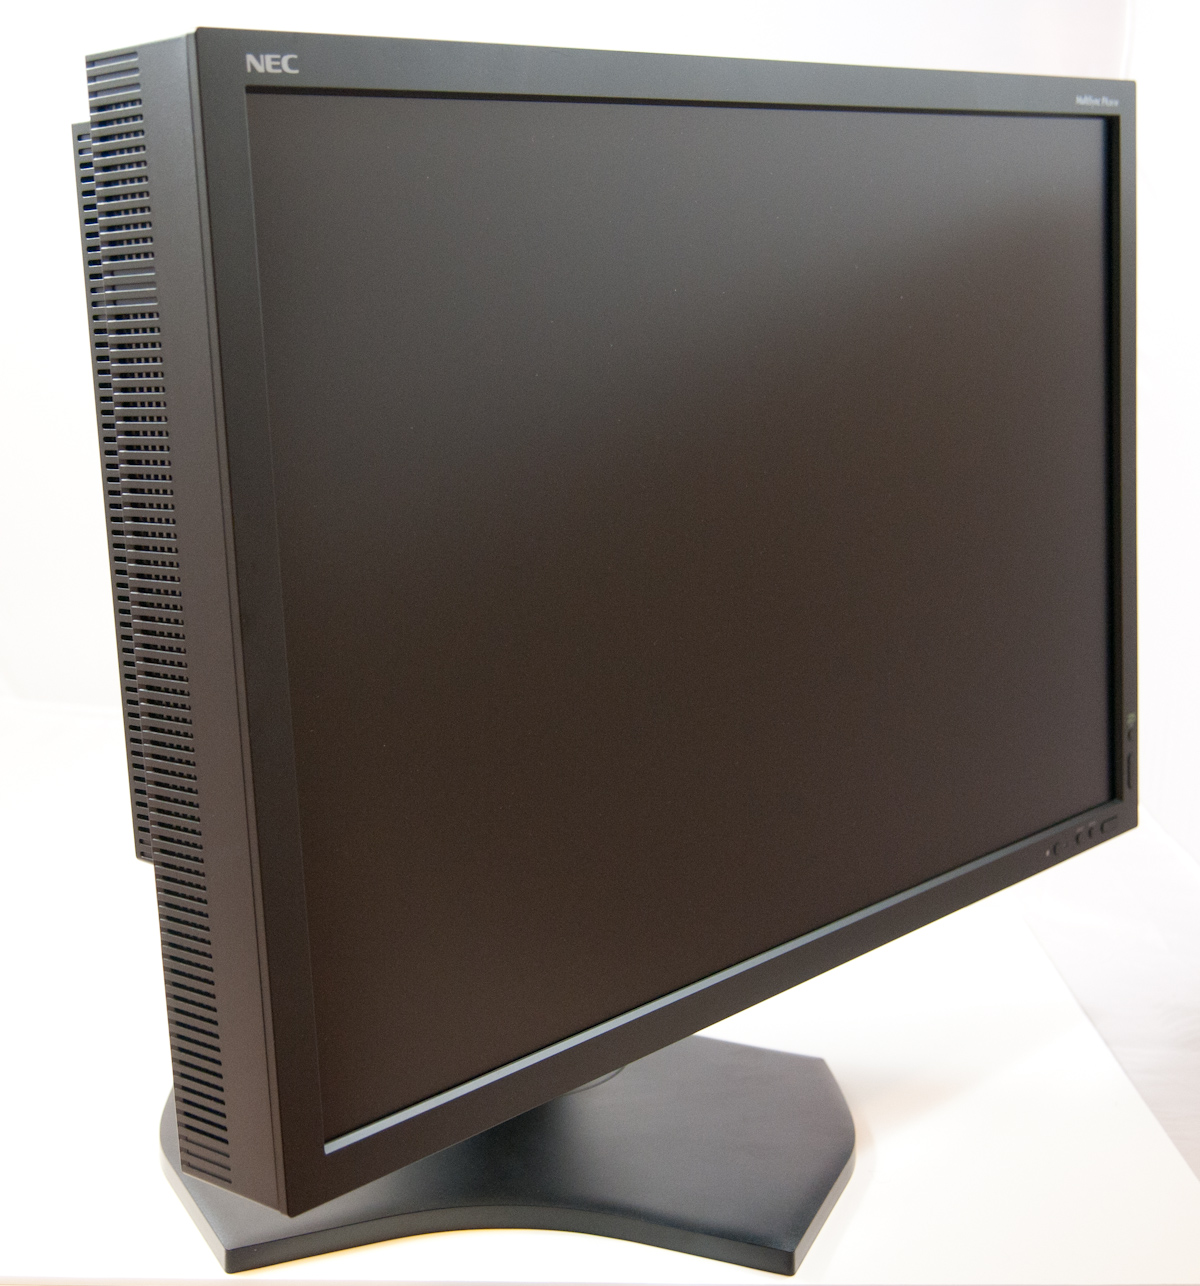
You'll notice so far that there's really no superficial aesthetic extras tacked onto the PA301w; this is a serious professional display. There's no metallic bezel running around the whole thing, no fancy shiny chrome parts, no gigantic self-aggrandizing logos on the back, no stickers plastered everywhere selling you what you've already ostensibly purchased and taken out of the box. It's just one huge monolithic slab of serious business.
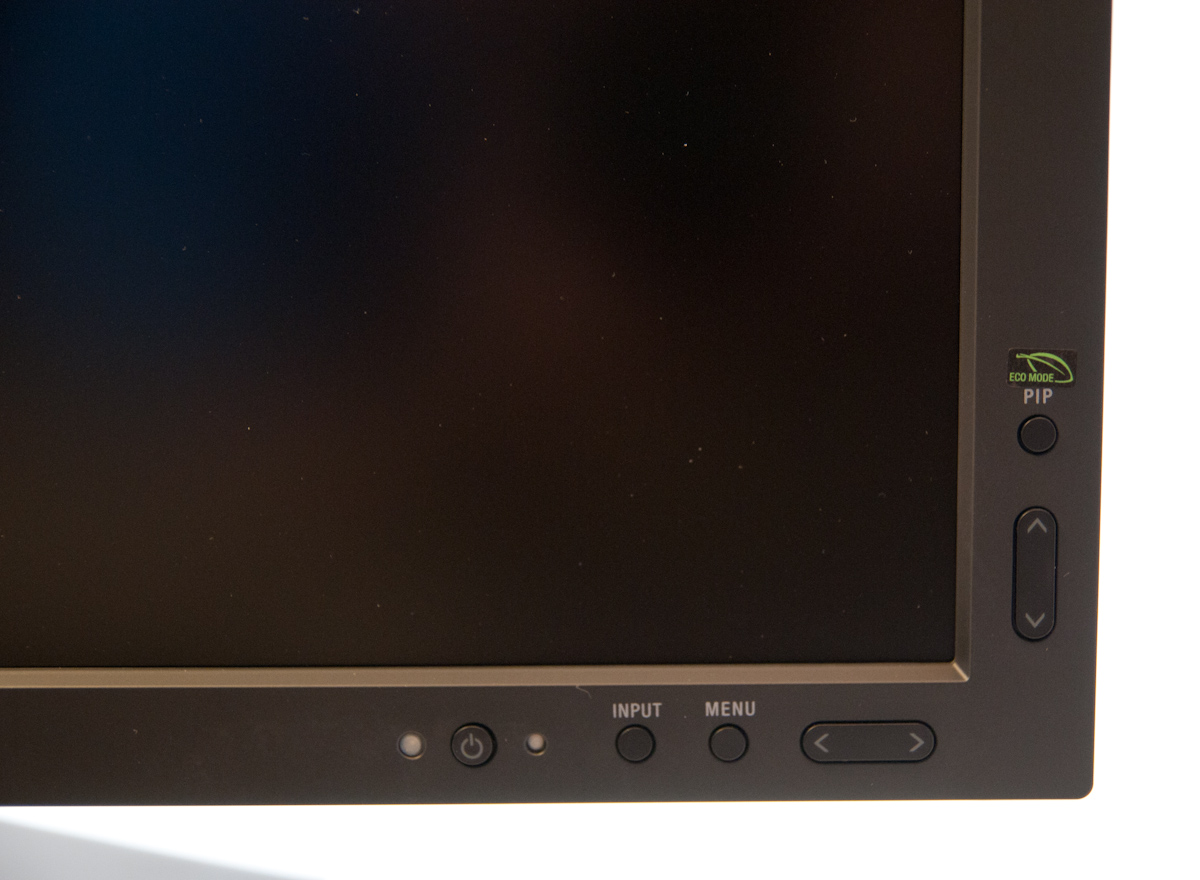
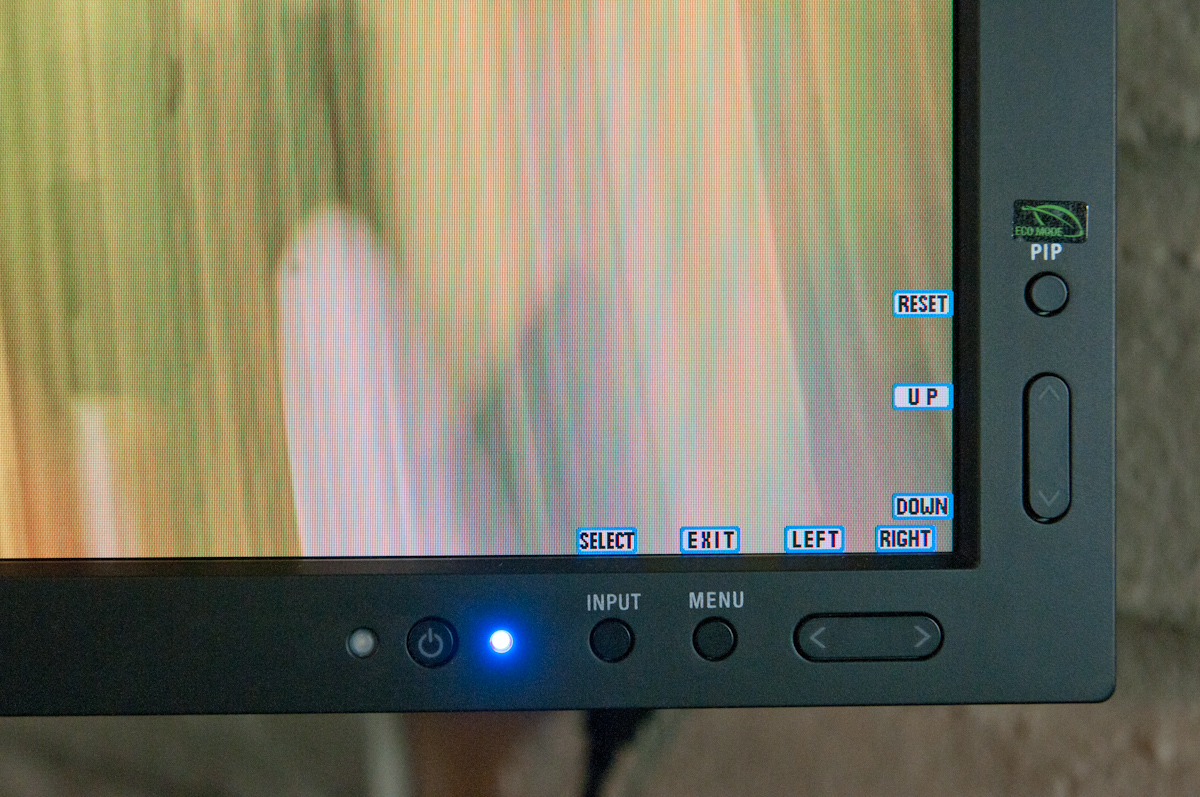
The front of the PA301w is also understated. The OSD control buttons are at the bottom right, and they're actual real clicky buttons, nothing capacitive. At the far left is the ambient light sensor, followed by power, followed by the power/status LED which glows blue when on, amber when in standby. The rest of the buttons are self explanatory and as we'll show in the OSD section get their own LCD driven labels when you actually jump into the OSD.

I've already shown it, but on the right side of the PA301w is one of the three downstream USB 2.0 ports. This port is rather special, however, since it's the one you can plug the X-Rite i1D2 in for onboard calibration. Of course, the port also works like normal when you're not in that special OSD section. The opposing side is spartan. I should also mention that the PA301w actual display panel is super thick, around 5" (12.7 cm). It's not a big deal, but it's just absolutely huge in comparison with other displays, so be prepared. The remainder of the ports are along the bottom of the lip underside. From left to right, the two remaining downstream USB 2.0 ports, two USB 2.0 upstream ports, 2x DisplayPort 1.1a, 2x DVI-D, and power.
What really sets the PA301w apart in my mind, however, is pivot support. That's right, you can use it in portrait orientation without using your own VESA mount. I should mention that although I didn't do it, you can get to the VESA mounting holes by pushing on the metal quick release lever right at the bottom of the mount.
Getting to portrait orientation is a bit of a challenge, however, as you can't simply just rotate the display 90 degrees - doing so crashes one side down into the base. The display also only rotates in the clockwise direction a significant amount. Counterclockwise rotation is limited to just a few degrees when facing the display from the front.

First, the display has to be tilted all the way out, then it can be rotated 90 degrees, and tilted back into perpendicular position. Rotate orientation in the display driver, and you're good to go. Vertical travel is limited to 1.2 inches in portrait, but hey, it's something, and it totally works.
Build quality of the PA301w isn't wanting for improvement at all. Though the exterior is entirely plastic, the entire display feels beefy and doesn't vibrate or chatter around when being adjusted. If you vibrate your desk while typing, the whole thing doesn't shudder either. Again, the spring preloads are just perfect for buttery smooth adjustment and damping on essentially every degree of freedom.
On Screen Display
Before we dive into the actual display performance numbers, it makes sense to talk about NEC's OSD and a little bit about the in-monitor calibration option that's offered.
Gallery: NEC PA301W OSD Gallery


Tapping the menu button brings up the OSD, but also enables some on-screen button labels that change accordingly as you move around inside. Rotate into portrait, and obviously buttons change - so too do the on-screen labels, which is awesome.
There are actually two sets of OSDs on the PA301w. The first is what you get when you hit menu, and is a nice (yet still comprehensive) skinned menu with pretty straightforward navigation. Settings for brightness, black, and eco mode are on the first tab, position and scaling are on the second, then color, tools, menu options, more eco settings, and finally the info tab. The second is the Advanced OSD I'll show in a moment.
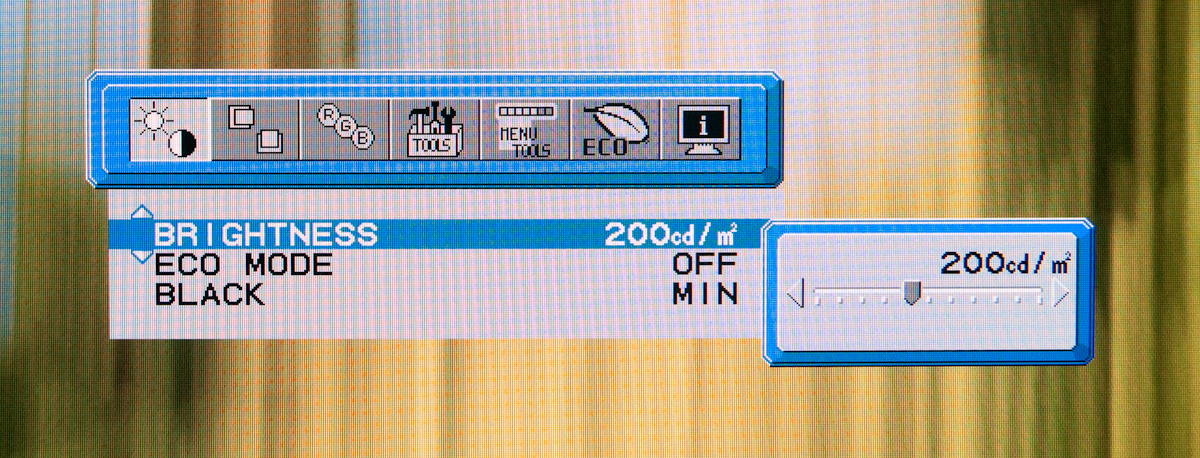
What's awesome about the settings is that everything has units where possible - brightness can be changed from 40 to 400 nits, black levels can also be artificially increased to match an adjacent display. As I'll show in a second, after you've run the in-monitor calibration, if you select a specific number, it'll actually drive the display relatively close to where it should be. What a breath of fresh air compared to completely arbitrary percentages.

Aspect ratio scaling options include full, aspect-correct, off (1:1), and custom, which is controlled from the advanced OSD. Inside the "RGB" tab are some basic color settings such as white point and simple color controls. Tools has PIP control if you want to use it, the USB port per video input mapping controls, some selection criteria for choosing video inputs, and off timer plus signaling. Menu tools is just OSD settings like position, color, and language.
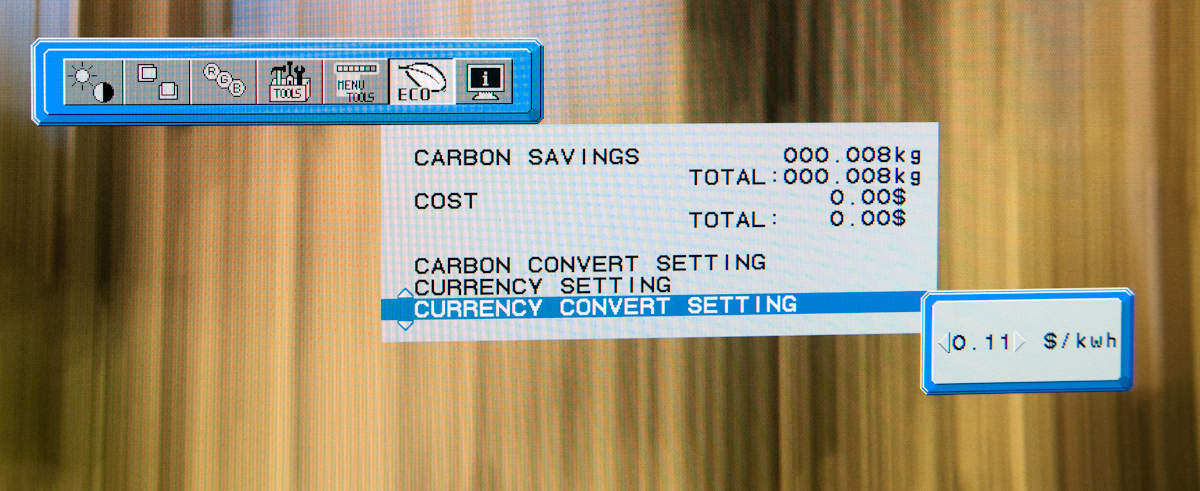
Inside "ECO" is some interesting stuff. Based on the configured price per kilowatt-hour, you can see the total electrical cost of using the monitor. In addition, based on the configured kg (of carbon) per kilowatt-hour, you can see how much carbon you've released indirectly. One field is for how much would've been used if you didn't have eco settings turned on, the other is how much you actually used. Both essentially enable some dynamic brightness based on ambient lighting measured on the front sensor - mode 1 corresponds to 200 nits of range, mode 2 corresponds to 100 nits.
What about that "advanced OSD?" Well, you can get to it two ways. Under the color tab, at the bottom, is a link named "Advanced Settings." Pressing select on that will bring you there, or you can get there by turning on the monitor by holding power and input at the same time. Doing so then makes the menu button consistently bring up the advanced OSD for the duration of the power-on session.
Inside are essentially the same options as the basic OSD, with more depth in the color/picture section and a few other places. White point and color tristimulus values are given in x and y, there's gamma control, and a new uniformity pane. If you're serious about getting color right, these are seriously useful. Initially however, things aren't that close to reality. Even though the white point is set at 6500K, we can see that measured value out of box is around 5600K. The color tristimulus points are also similarly completely wrong.

This is where the in-monitor calibration is super handy, as it internally calibrates the monitor so these settings actually reflect reality instead of remain shifted by however much the monitor has drifted or differs from ideal. Initially, I spent lots of time tweaking the display color points in HCFR, shifting appropriately based on how much the numbers differed from measured. While that actually did yield better results, running the built-in calibration routine got me 90% of the way there in 1 minute instead of 1 hour like I'm used to doing manually.
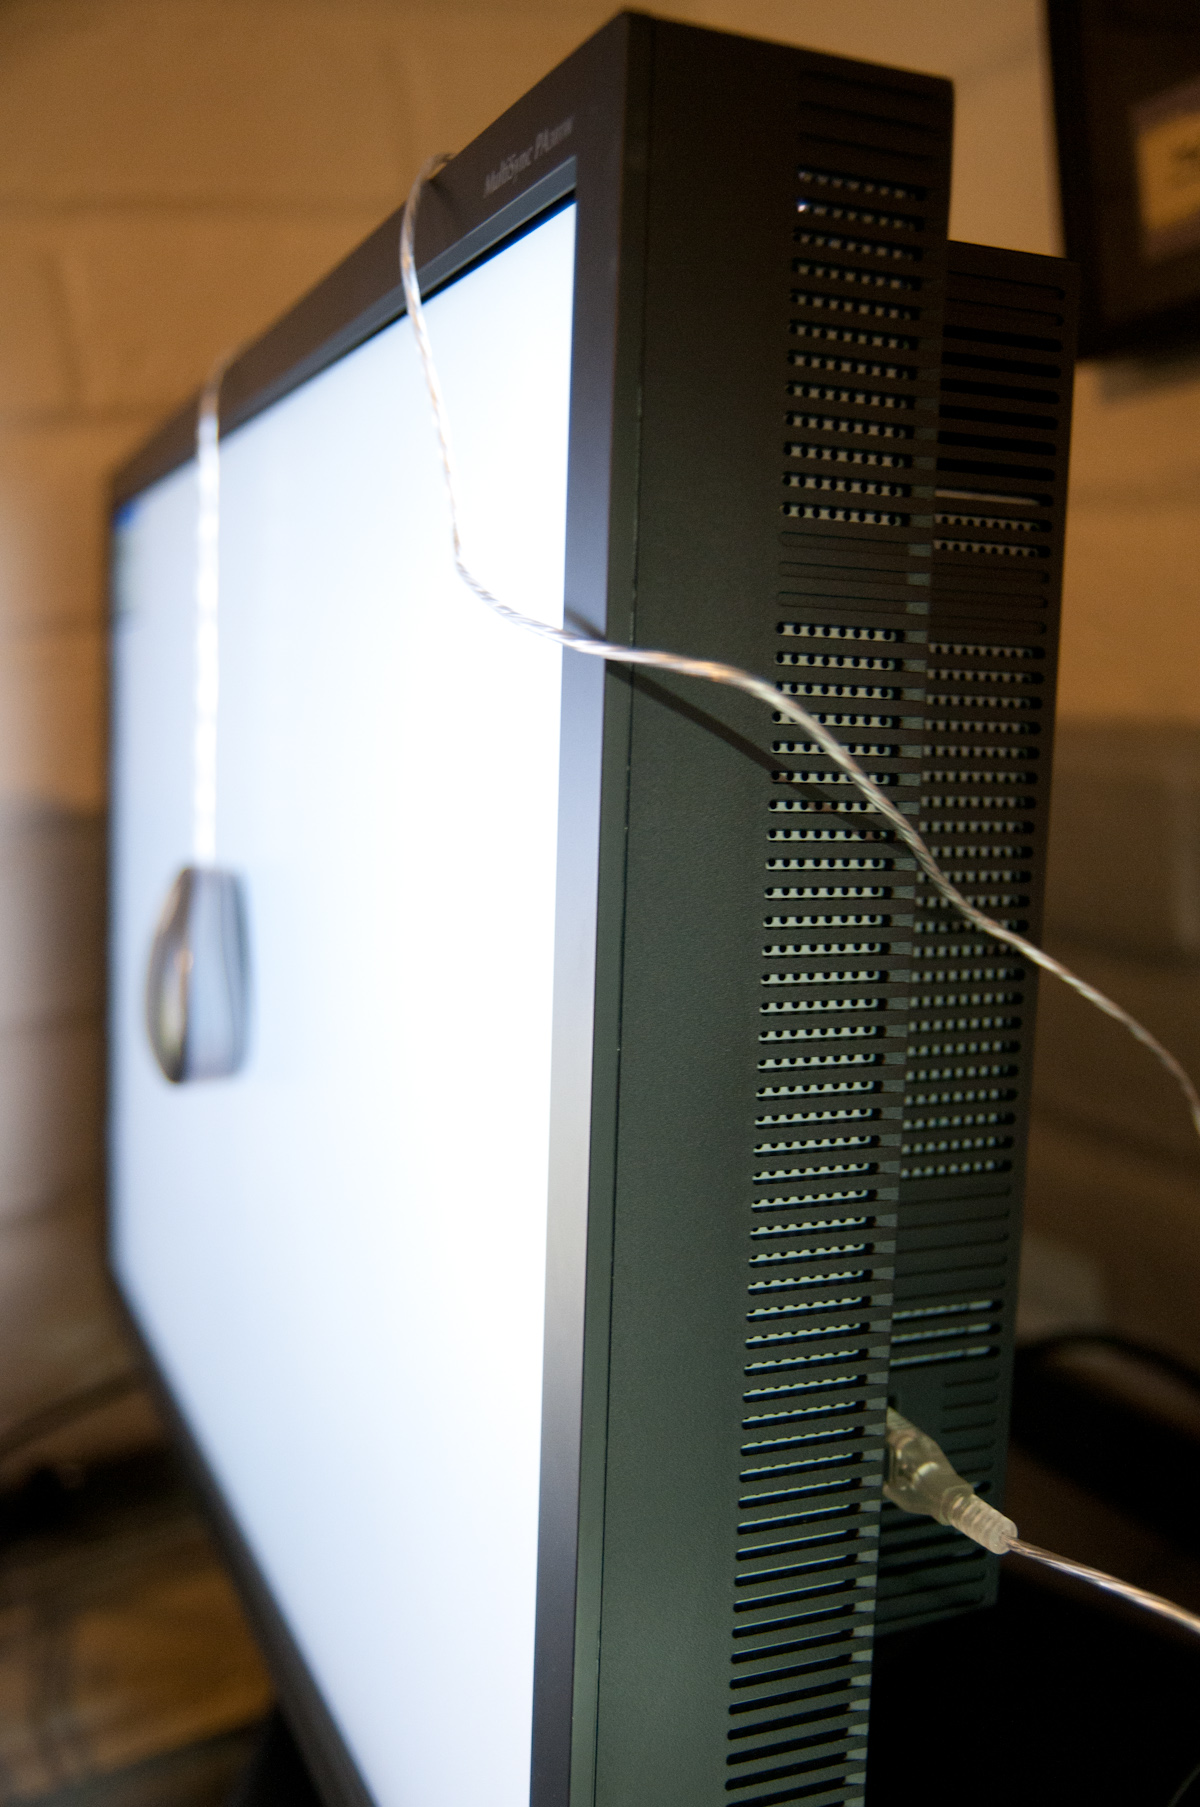
Internal calibration mode only works with x-rite i1D2 colorimeters. NEC has a rebranded version they sell in a bundle, or you can buy your own. Chances are if you're willing to spend $2k+ on an LCD, you're also willing to spend the $200 to get an i1D2. Again, it plugs into the right-side USB port. To get into calibration mode, either find stand-alone calibration in tab B of the menu, or press the left and right keys at the same time from the no signal screen. The display will initialize the sensor, then tell you to wait 30 minutes for the CCFL to settle - welcome to how long calibrating CCFL backlit displays usually takes in-between adjustments.
After that, you can select "self" for self calibration, or "copy" mode to actually match another PA301w or another display entirely. The display will prompt you to stick the colorimeter in the center, then run through its tests. The actual set of tests seems very basic - red, green, blue, then a whitepoint and brightness test. It takes almost exactly one minute to run, then tells you it's all done.
The results are awesome. After running through, the white point is much closer to the actual reported value, and the primary color tristimulus values are much closer to what they should be. Note below how the brightness value and color temperature value are now much closer than they were pre-calibration.
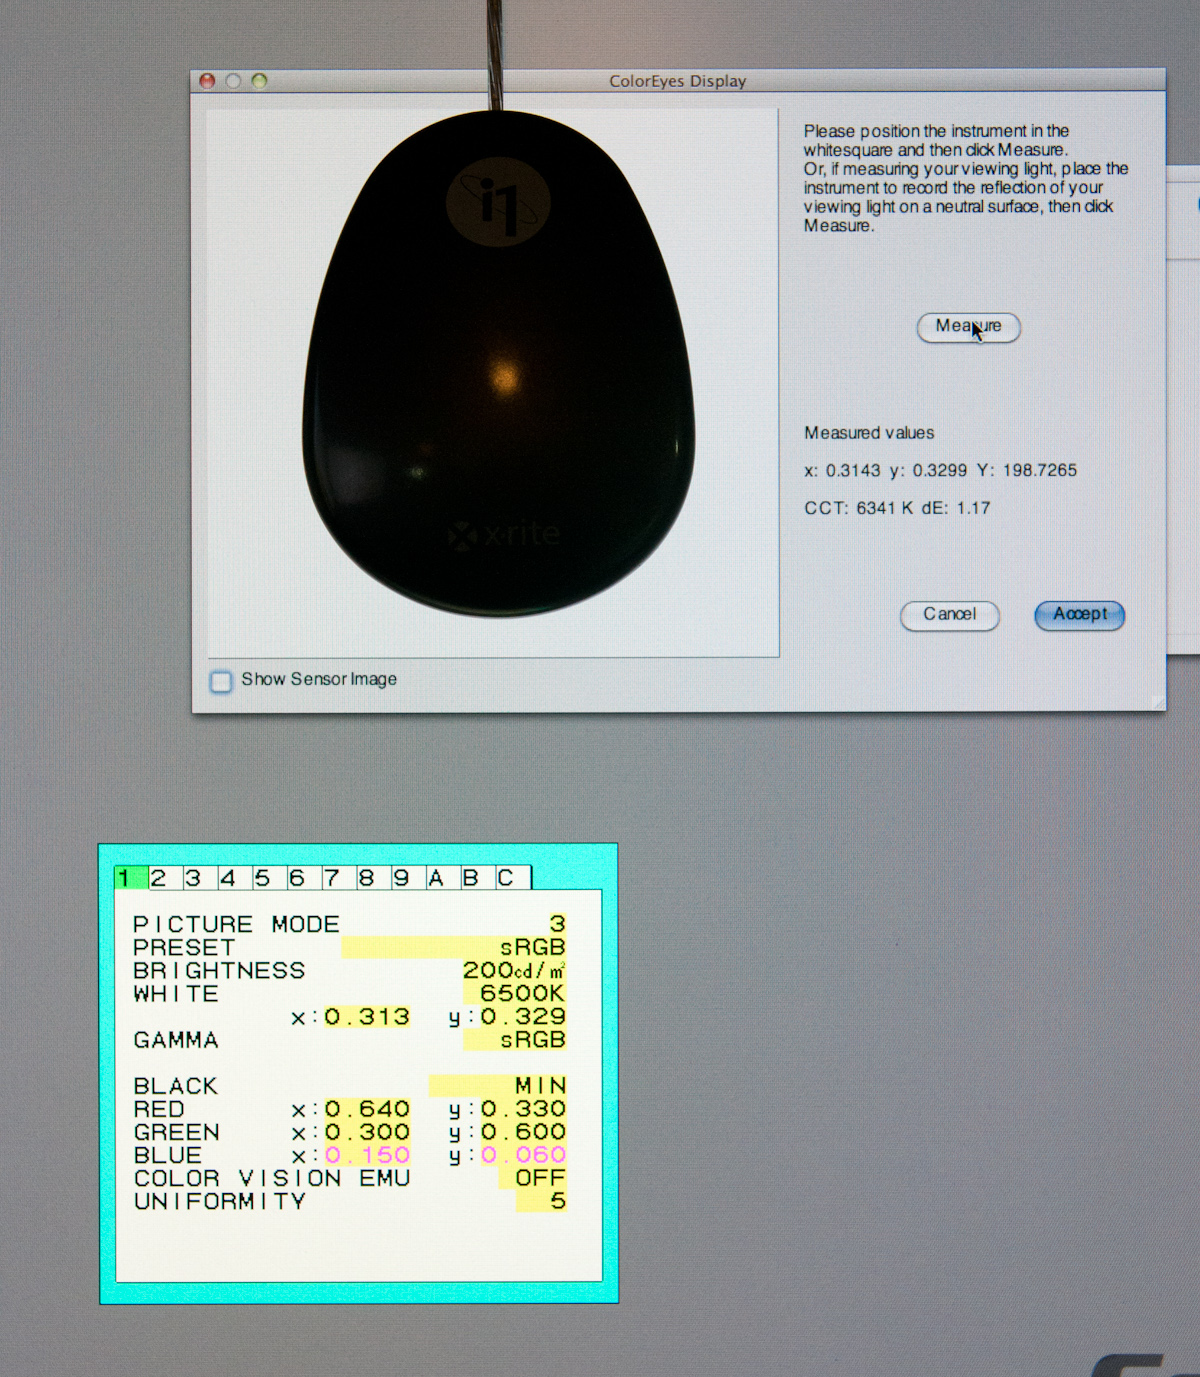
The even better part is that the presets also now correctly work for mapping to different color spaces. If you try to use them without calibration, you risk being offset depending on how the monitor has drifted. I still ended up tweaking all six of the x y values for red green and blue, but they were much, much closer than before.
Viewing Angles
I almost don't need to say it, but the PA301w has superb viewing angles just as advertised. In both the horizontal and vertical directions, there's almost no distortion until viewed at the most extreme of angles. There's a bit more sensitivity in the vertical direction, but the difference is essentially insubstantial. Using the display in portrait is actually just an awesome testament to how good those viewing angles are - it's completely useable with no annoyances.

It's actually mind-blowing to use something this vertical to browse the net for even a few hours.
Color Quality
Next up are the ever-important color quality metrics. As usual, we report two main quality metrics: color accuracy (Delta-E) and color gamut. Color gamut refers to the range of colors the display is able to represent with respect to some color space. In this case, our reference is the AdobeRGB 1998 color space, which is larger than the sRGB color space. Our percentages are thus reported with respect to AdobeRGB 1998, and larger is generally better unless you're dealing with sRGB content and colorspace-unaware software.
Color accuracy (Delta E) refers to the display’s ability to display the correct color requested by the GPU and OS. The difference between the color represented by the display, and the color requested by the GPU is our Delta-E, and lower is better here. In practice, a Delta E under 1.0 is perfect - the chromatic sensitivity of the human eye is not great enough to distinguish a difference. Moving up, a Delta E of 2.0 or less is generally considered fit for use in a professional imaging environment - it isn’t perfect, but it’s hard to gauge the difference. Finally, Delta E of 4.0 and above is considered visible with the human eye. Of course, the big consideration here is frame of reference; unless you have another monitor or some print samples like a Gretag Macbeth color checker card to compare your display with, you might not notice.
As I mentioned in our earlier reviews, we’ve updated our display test bench. We’ve deprecated the Monaco Optix XR Pro colorimeter in favor of an Xrite i1D2 since there are no longer up-to-date drivers for modern platforms. We're trying to find an i1Pro to use as well.
For these tests, we calibrate the display and try to obtain the best Delta-E we can get at both 200 nits of brightness for normal use, and 100 nits for print brightness. We target D65 and a gamma of 2.2, but sometimes the best performance lies at native temperature and another gamma, so we try to find what absolute absolute best-case performance for each display. We also take an uncalibrated measurement to show performance out of the box using either the manufacturer supplied color profile, or a generic one with no LUT data. For all of these, dynamic contrast is disabled, and displays are left to settle for a half hour after making changes. The PA301w is CCFL-backlit, and I used a settle time of 30 minutes accordingly.
With the PA301w, I used the internal calibration routine to get me close, and then HCFR and the advanced OSD to get the color tristimulus primary values perfect. Then I calibrated with ColorEyes Display Pro.
First up is uncalibrated Delta-E performance. For this test, I took the monitor out of the box, connected it over DisplayPort, adjusted to 200 nits, and ran our usual GMB color checker test.

I took our uncalibrated test literally and ran this before using internal calibration either. Unsurprisingly, results aren't very good, and we see pretty middling performance out of the PA301w without any calibration. That said, if you're getting a professional monitor, you're hopefully going to calibrate it so you can actually enjoy what you're paying for. I didn't test, but running the in-monitor calibration alone has to help this out somewhat.
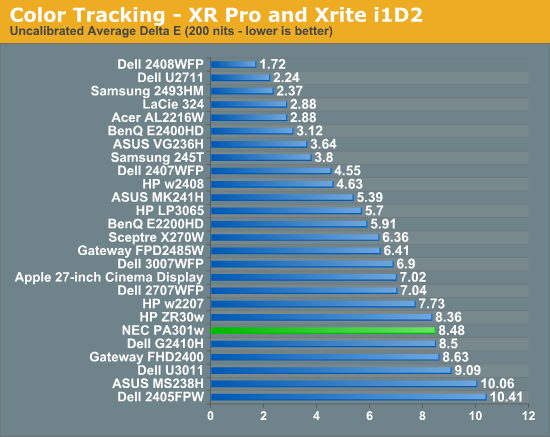
Moving on to the important 200 nit calibrated results, we can see the PA301w do very well, but still not displace the HP ZR30w result. I spent a lot of time trying to squeeze everything I could out of the PA301w and Delta E of 1.09 was as good as things would get. The result is still very good, I was just hoping to see something below 1.0 across the board like Jarred used to consistently. I'm beginning to suspect the i1D2 simply isn't as good of an instrument as the XR Pro, and what we're seeing is just instrumentational error creep in.
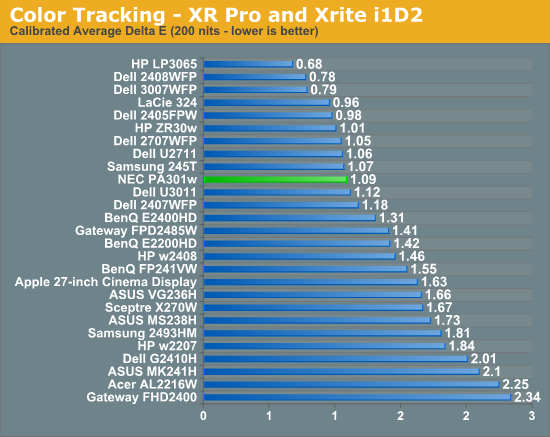

The PA301w doesn't have the typical spiky peaks that other displays which lack RGB controls show, which is great to see. You can see that the ZR30w still leads in some places, though the PA301w is clearly better in the greys.
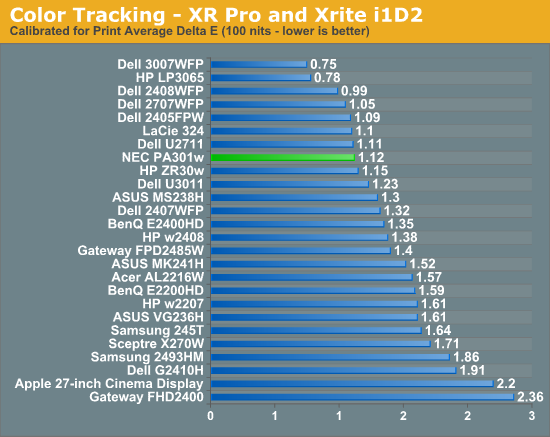
At 100 nits, the PA301w pulls away and narrowly edges out the rest of the 30-inchers. Again, we still don't get a result that's under 1.0, but the numbers are obviously good enough for professional use.

I'm impressed with color tracking on the PA301w and honestly think it can do better if we had an i1Pro spectroradiometer. I'm trying to get our hands on a good one, so we might just see it soon for these more serious display reviews.
Gamut percentage is important as well, and this is the only real place I think the U3011 has a distinct advantage. The PA301w has a "FULL" picture setting preset in the OSD which seems to change the red green and blue values to the edge of the display's supported gamut size. You can adjust further, however the labels turn pink which indicates that they're outside of the gamut. I went with full and took a reading, as expanding manually beyond didn't change the value any further. We can also see that the sRGB mode really clamps down on gamut percentage, and definitely works. There's also an AdobeRGB mode and a number of other common color spaces included. The PA301w uses an internal LUT to map color.

Color Consistency
Now for color consistency, we take our best calibration profile from the very center at 200 nits and test color accuracy at 9 different places around the LCD display in an evenly distributed grid. We’ve shown before that calibration is actually very localized across the display, partly due to the brightness not being uniform, partly due to the discrete nature of the LCD panel itself.
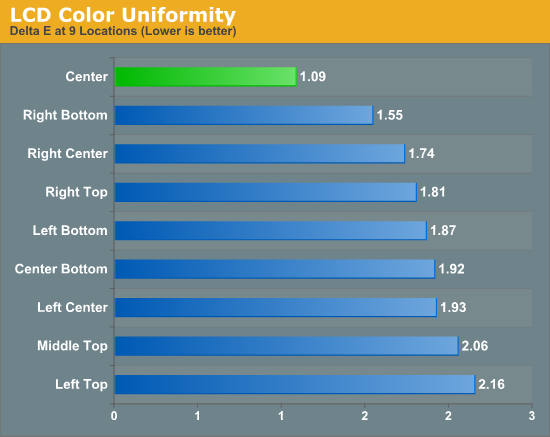


If you go back and compare to the other 30-inchers, you'll discover that the PA301w is narrowly edges out the HP ZR30w and has a clear advantage over the Dell U3011. Interestingly enough, the PA301w has a uniformity setting inside the OSD which defaults to 5 (maximum) and seems to definitely improve overall brightness uniformity and Delta-E consistency. Whatever secret sauce NEC has apparently works.
Brightness and Contrast
For brightness, black level, and contrast points, we use the same colorimeter setup described earlier. Specifically, we use an Xrite i1D2 with ColorEyes Display Pro, and take measurements at maximum and minimum brightness of white and black targets. Dynamic contrast is turned off. We also let the panels settle in for a half hour at the respective settings before taking any measurements.
The PA301w uses a CCFL backlight, which makes that warm up time even more critical. The PA301w has an interesting quick warmup feature that reduces the visible brightness increase period dramatically. At power on, I measured brightness go from 160 nits (with the OSD showing 200 nits, blinking) to 210 nits in under one minute, then gradually settle to the desired 200 nits. There's a bit of overshoot, but the visual difference is hard if not impossible to actually pick out. For the sake of these tests, I waited for things to settle, but it's actually impressive how fast the PA301w can warm up to totally useable brightness levels.
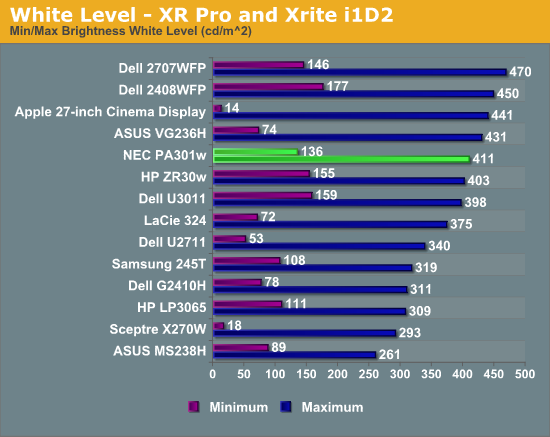
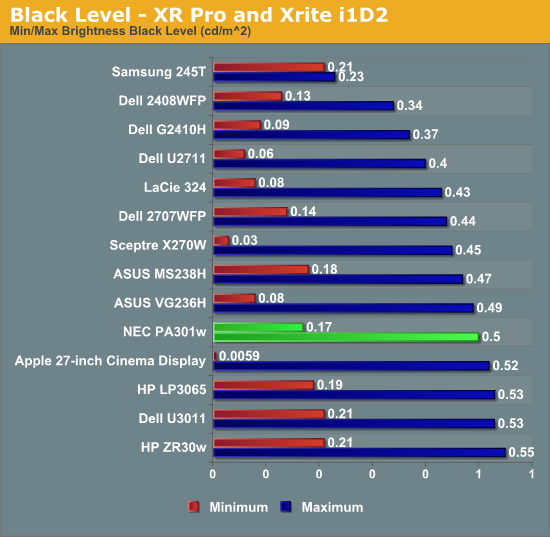
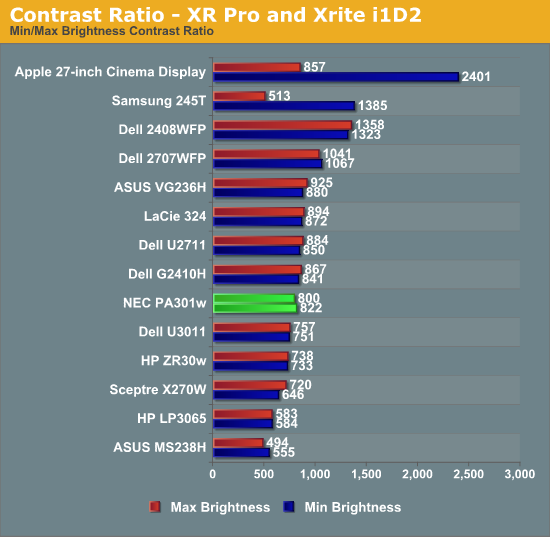
Brightness settings in the OSD follow the same rules as color ones - if you select something impossible, the last changed value will show up pink, meaning it's outside of the monitor's capabilities. The same thing applies for brightness. I had no problem reaching 411 nits of brightness after getting that worked out - it's a similar thing I've seen on all other displays, sometimes you need to change contrast or color adjustment settings appropriately. Regardless, the PA301w went above the specified 350 nits of brightness, reaching 411. Contrast isn't quite the 1000:1 advertised typical, instead hovering around 800:1 pretty consistently.
Brightness Uniformity
For brightness uniformity, we test at the same 9 points we measure Delta-E on, but this time measure white and black levels when the center point is as close to 200 nits as we can get. We use the same colorimeter and software as before, - an Xrite i1D2 and ColorEyes Display Pro. Similar to the ordinary brightness test (taken at the center), contrast is set to 100 in the OSD and brightness is set to as close to 200 as possible in the center before measurements are taken.
White Uniformity


Black Uniformity


It appears that the PA301w's built-in uniformity settings help keep the brightness profile very steady in the full on white test. There's a tiny horizontal dependence from left to right, but it's imperceptible in practice, and the standard deviation of these readings is just 4 nits. Uniformity in the white department is actually very good.
Blacks are a little worse, again the bottom left seems to be brighter than the rest of the display by a measurable and consistent amount. On the whole again though the consistency is pretty good. Displaying a purely black image, there's also no obvious light leakage anywhere on the display.
Power Consumption
The PA301w has a definite eco-friendly slant with a number of features that will automatically dim the display depending on ambient lighting conditions, should you choose to use them. That said, nothing is going to get you around the fact that it's a 30-inch CCFL-backlit LCD that simply requires a lot of brightness to look good. Factor in IPS, even P-IPS transmission losses, and we get power hungry 30-inchers from everyone.
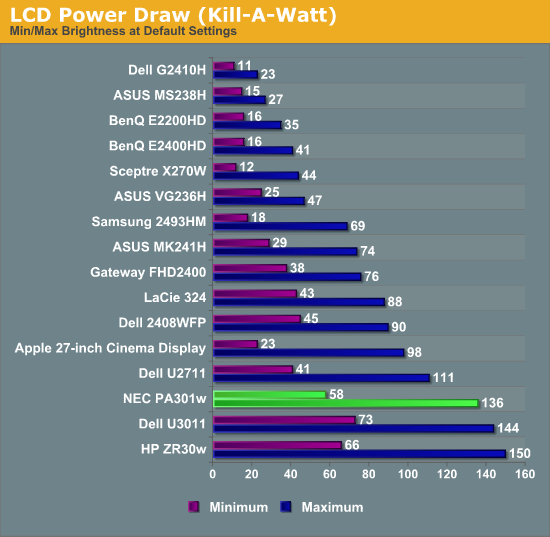
Surprisingly, the PA301w actually uses less power than the competition at both minimum and maximum brightness settings. Very respectable performance. I also subjectively found that heat dissipation was very modest, and measured the top of the display chassis to have a maximum of 111.2 F. That sounds like a lot until you consider that the two VA panels I sit in front of measured a a maximum of 134.6 F.
Conclusions and Final Thoughts
NEC's PA301w delivers the performance and features that professionals demand, including a number of extras that easily distinguish it in the 30-inch class. On-display calibration if you have an i1D2, power management modes and reporting, internal color space clamping through a user-configurable hardware LUT, and a bulit-in USB KVM switch to accompany the two sets of DVI-D and DisplayPort inputs definitely differentiate the PA301w. On-display calibration with an i1D2 colorimeter is something that seriously makes calibration easier, though manual tweaking afterwards will still produce even better results. I find myself going back to this feature endlessly because calibration really is a two-step process of getting the monitor close to perfect, then using software to get it the extra bit. Things like DDC help automate the process, but even then I find myself spending forever in OSDs with each of these display reviews to get the settings right. The ability to plug the colorimeter right into the display and let it tackle 80 or 90 percent of the on-monitor process makes getting it the remaining 10 percent way less of a headache. Doing this right ensures that the software LUT doesn't have to correct as much, and as a result you (in theory at least) get better results with less banding.
The PA301w performed as expected in our display tests, leading the current crop of 30-inchers in all categories but 200 nit Delta-E. Despite lots of coaxing, I couldn't get that number below 1.09, which is a little bit surprising for P-IPS, though I'm starting to think that number could get slightly better with improved instrumentation. On the whole, the PA301w has excellent color tracking that's more than adequate for professional work.
Uniformity on the PA301w is also superb with the default setting of "5" selected in the advanced OSD. I guess the dichotomy of having two OSDs is somewhat of a downside, why not just have one with everything inside in one place?
The only other issue with the PA301w is its sheer size. It's the biggest, heaviest, thickest, LCD display I've ever used, much less laid eyes on. If you're uncompromising about performance, generally having the slimmest or lightest isn't a concern, so this isn't a big deal, but be warned. It's seriously the Ron Jeremy of monitors if there were such a thing.
NEC's new 30-inch display is definitely solid, it's hard to argue that it isn't the best 30-inch display - heck, monitor in general - that I've tested yet. If you can stomach the $2,300 price tag, it's totally worth it. If you don't have a colorimeter or software, there's a $2,549 version (PA301w-BK-SV) as well, which isn't that bad of a deal considering the i1D2 runs around $200 alone. The only remaining 30-inch comparison we haven't looked at closely is Eizo's... Maybe they'll let us take a peek soon.


0 comments:
Post a Comment